KAmodRPi5 PCIe-M.2 mini: Difference between revisions
From Kamamilabs.com - Wiki
| (One intermediate revision by the same user not shown) | |||
| Line 1: | Line 1: | ||
__jzpdf__ | __jzpdf__ | ||
===== Description ===== | ===== Description ===== | ||
<b>Miniature NVME M.2 M-Key Disk Adapter for Raspberry Pi 5</b> <br> | <b>[https://kamami.pl/en/communication-modules/1192946-kamodrpi5-pcie-m2-mini-miniature-nvme-m2-m-key-drive-adapter-for-raspberry-pi-5-5906623487981.html KAmodRPi5 PCIe-M.2 mini] - Miniature NVME M.2 M-Key Disk Adapter for Raspberry Pi 5</b> <br> | ||
The Raspberry Pi 5 computer is equipped with a PCI Express interface led out to a custom, miniature FFC connector marked on the board as PCIe. It allows you to connect modern SSDs that support the fast and reliable NVME protocol, and then the Raspberry Pi can become a multimedia center or file server, while maintaining a small size and energy efficiency. This requires the use of the KAmod RPi5 M.2 mini adapter, which allows you to connect an NVME disk with an M.2 M-key connector, in size <b>2230</b> or <b>2242</b>. | The Raspberry Pi 5 computer is equipped with a PCI Express interface led out to a custom, miniature FFC connector marked on the board as PCIe. It allows you to connect modern SSDs that support the fast and reliable NVME protocol, and then the Raspberry Pi can become a multimedia center or file server, while maintaining a small size and energy efficiency. This requires the use of the KAmod RPi5 M.2 mini adapter, which allows you to connect an NVME disk with an M.2 M-key connector, in size <b>2230</b> or <b>2242</b>. | ||
| Line 154: | Line 154: | ||
'''<pre style="color: blue">sudo apt-get upgrade</pre>''' <br> | '''<pre style="color: blue">sudo apt-get upgrade</pre>''' <br> | ||
<center> | <center> | ||
[[File: | [[File:KAmod_RPi5_M.2_mini_aktualizacja.jpg|none|600px|thumb|center]] | ||
</center> | </center> | ||
<br>Completing all the actions may take several minutes, depending on the number of components that require updating (the console window may display many more messages than in the example below). Any questions should be confirmed by pressing Y (Yes). | <br>Completing all the actions may take several minutes, depending on the number of components that require updating (the console window may display many more messages than in the example below). Any questions should be confirmed by pressing Y (Yes). | ||
Latest revision as of 16:00, 26 October 2024

Description
KAmodRPi5 PCIe-M.2 mini - Miniature NVME M.2 M-Key Disk Adapter for Raspberry Pi 5
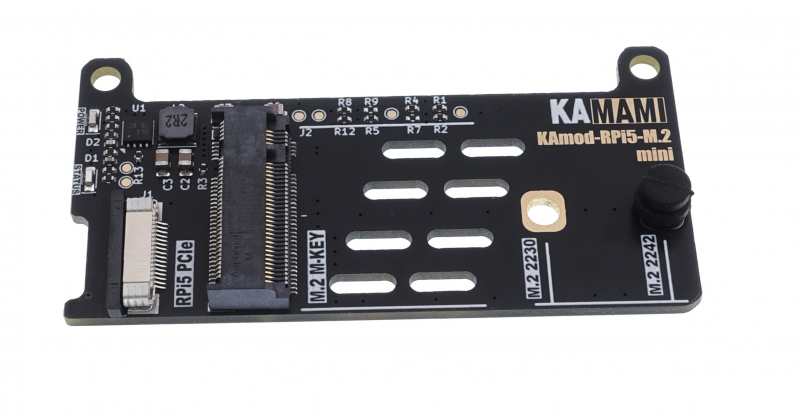
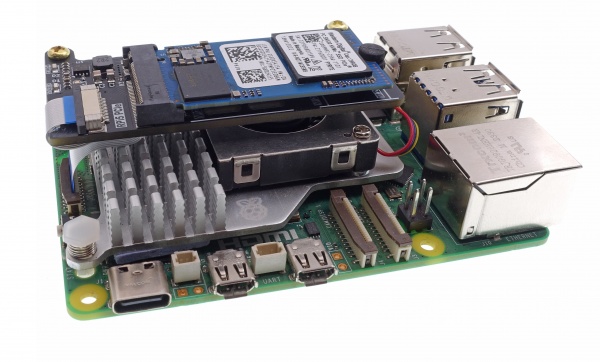
The Raspberry Pi 5 computer is equipped with a PCI Express interface led out to a custom, miniature FFC connector marked on the board as PCIe. It allows you to connect modern SSDs that support the fast and reliable NVME protocol, and then the Raspberry Pi can become a multimedia center or file server, while maintaining a small size and energy efficiency. This requires the use of the KAmod RPi5 M.2 mini adapter, which allows you to connect an NVME disk with an M.2 M-key connector, in size 2230 or 2242.
Basic parameters
- The adapter is designed for easy installation on the Raspberry Pi 5 board
- The connection to the Raspberry Pi 5 computer is via a 16/0.5 FFC ribbon
- It does not block the 40-pin GPIO connector
- It allows you to connect an NVME drive with an M.2 M-key (NGFF M-key) connector
- Communication via the PCI Express Gen2 x1 interface (optionally also Gen3 x1)
- It allows you to mount a 2230 or 2242 size drive
- It supplies a voltage of 3.3 V and a maximum current of 1 A to power the drive
- LED indicators signaling correct power supply and drive activity
- Dimensions: 32.5x64 mm
- The design of the adapter does not block the possibility of using a dedicated radiator with a fan for Raspberry Pi 5 - Raspberry Pi Active Cooler
Not every NVME M.2 drive is compatible with the Raspberry Pi 5 computer
Standard equipment
| Code | Description |
|---|---|
| KAmod RPi5 M.2 mini |
Assembled and started module |
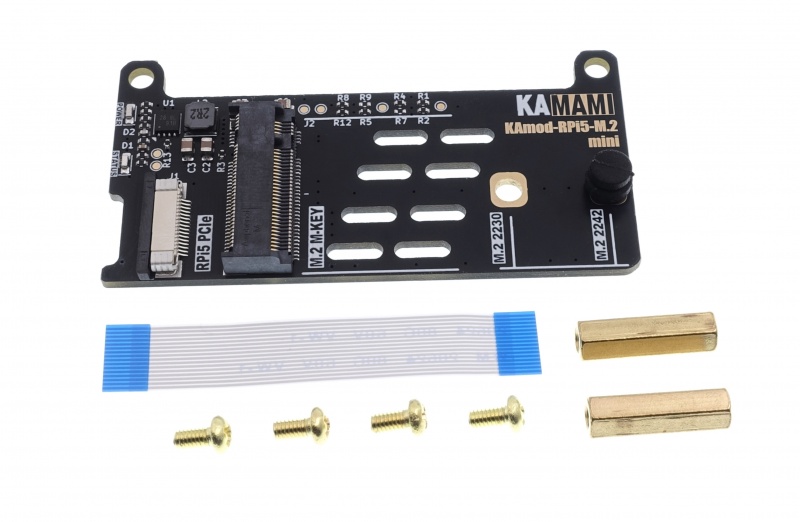
| FFC 16/0.5 tape |
Makes electrical connection of PCI Express interface |
|
Mounting kit:
|
Allows to mount the adapter on the RPi5 board |
PCI Express connector
| Connector | Description |
|---|---|
| J1 - RPi5 PCIe |
|
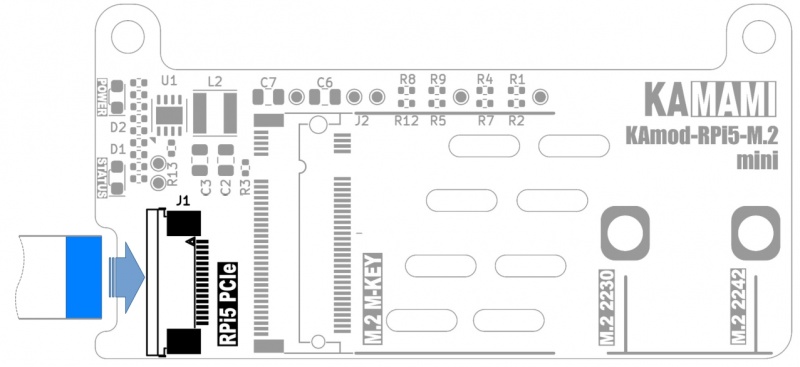
The PCI Express connector of the KAmod RPi5 M.2 mini adapter should be connected to the PCIe connector on the Raspberry Pi 5 board using an FFC 16/0.5 connecting ribbon. The ribbon should be inserted from the edge of the board, with the contacts aligned to the board plane - i.e. the blue marker must be on the outside, as shown in the figure below. Before inserting the ribbon into the connector, gently push back the lock on the J1 connector (dark element) - by approx. 2 mm. After inserting the ribbon, the lock should be gently pushed in so that the ribbon is locked in the connector.
NVME M.2 M-key Drive Connector
| Connector | Description |
|---|---|
| J2 - M.2 M-KEY |
|
The J2 type M.2 (NGFF) connector with an “M” type key (M-KEY) allows you to connect a standard NVME drive. The set of holes on the board allows for stable mounting of drives in sizes 2230 or 2242.

LED indicator lights
| LED indicator light | Description |
|---|---|
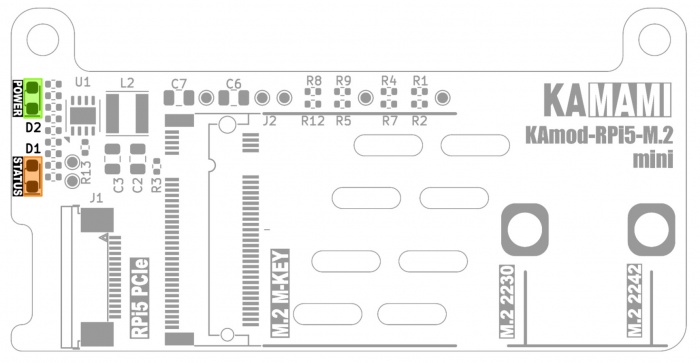
| D1 - STATUS |
When the light is on, it indicates that data is being written/read/transferred to the NVME drive |
| D2 - POWER |
A clear glow indicates correct power parameters of the NVME drive |
Mounting the NVME M.2 drive in the KAmod RPi5 M.2 mini adapter
Note! Connecting and disconnecting the NVME M.2 drive should only be done when the Raspberry Pi 5 computer is turned off and disconnected from the power supply.
First, determine the size of the drive (not the capacity) - 2230 or 2242 drives are accepted. Knowing the size of the drive, install the flexible mounting clip in the hole corresponding to the given size of the drive. Now you can insert the NVME M.2 drive into the J2 connector (M.2 M-KEY), so that the end of the drive protrudes slightly from the board. Then, gently tilt the mounting clip towards the edge of the board, press the drive against the clip and release the clip so that it locks the drive in the adapter.
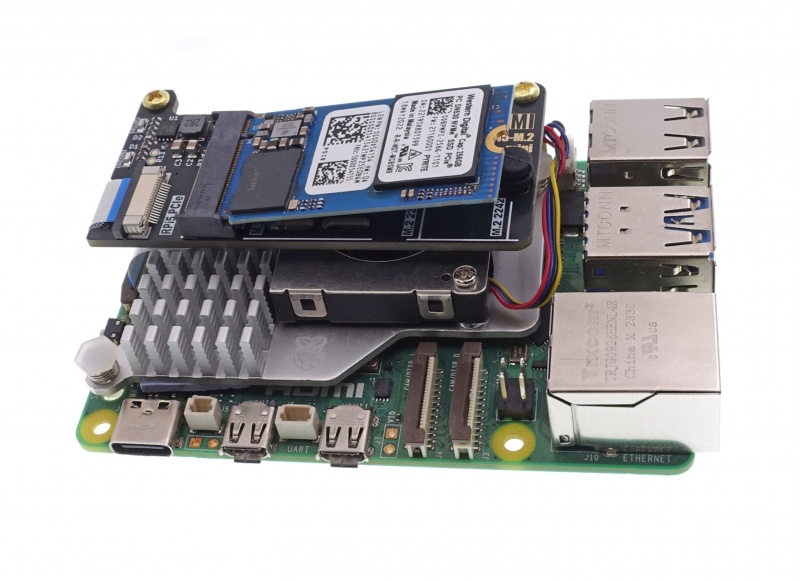
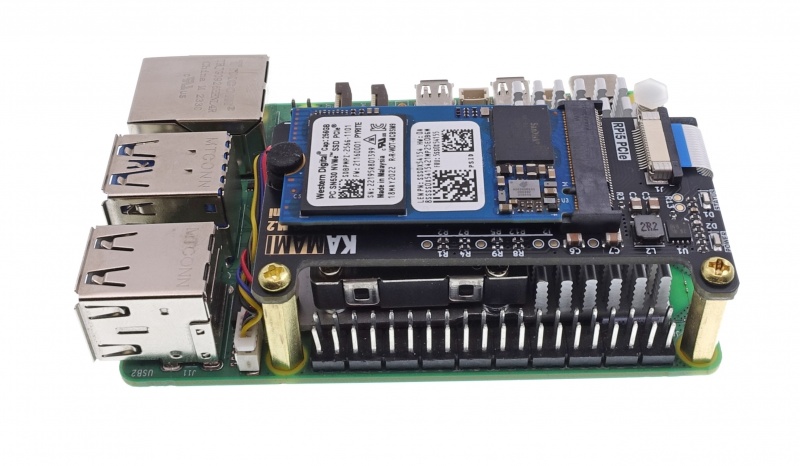
Mounting the KAmod RPi5 M.2 mini adapter on the Raspberry Pi 5 board
First, connect the FFC ribbon to the RPi5 PCIe connector, from the edge of the board, with the contacts aligned to the board plane - i.e. the blue marker must be on the outside, as shown in the drawing in the chapter PCI Express connector. Before inserting the ribbon into the connector, gently push back the lock on the J1 connector (dark element) - by about 2 mm. After inserting the ribbon, gently push in the lock so that the ribbon is locked in the connector.
Now, the KAmod RPi5 M.2 mini adapter with the ribbon installed should be placed next to the Raspberry Pi 5. This allows you to easily connect the FFC ribbon to the PCIe connector on the Raspberry Pi 5 board. Here, too, you should slide out the lock, place the ribbon with the contacts toward the center of the board, and push in the lock so that the ribbon is locked in the connector.
After attaching the ribbon, place the adapter above the Raspberry Pi 5 computer and arrange the ribbon so that it is between the boards (or between the adapter board and the RPi5 radiator). Finally, you should install 16 mm high sleeves at the GPIO connector, which will hold the entire structure stably.
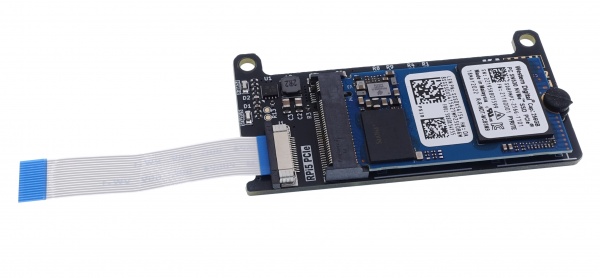
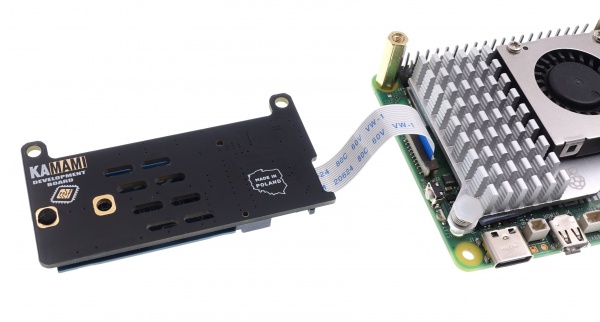
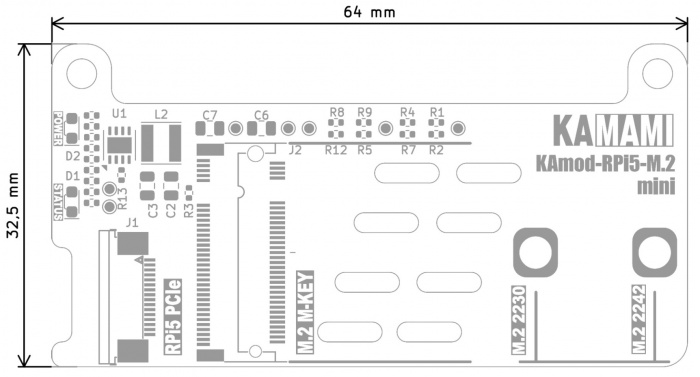
Dimensions of the KAmod RPi5 M.2 mini adapter
The dimensions of the board are 32.5x64 mm, its shape does not block access to the GPIO connector and other connectors on the RPi 5 board.
Booting the system from an NVME M.2 drive
Booting the Raspberry Pi 5 system from an NVME drive requires installing a system image on that drive. This can be done by having an RPi5 computer running from a microSD memory card. The following steps should be performed:
Operating system update
We start RPi5 with a mounted memory card containing the working Raspberry Pi 5 operating system. After the system desktop is displayed, open the console window (Terminal), e.g. using the key combination Ctrl+Alt+T and enter:
sudo apt-get update
and then:
sudo apt-get upgrade
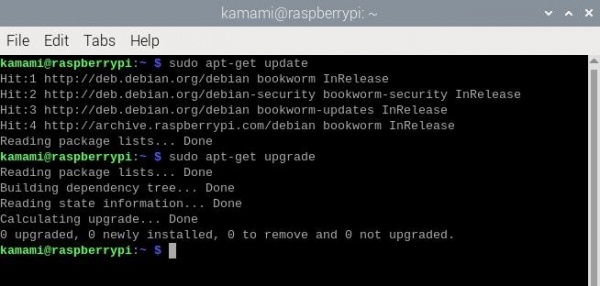
Completing all the actions may take several minutes, depending on the number of components that require updating (the console window may display many more messages than in the example below). Any questions should be confirmed by pressing Y (Yes).
Finally, restart the system, e.g. by entering the command:
sudo reboot
Updating the EEPROM memory content
Open the console window (Terminal), e.g. by pressing Ctrl+Alt+T and entering:
sudo rpi-eeprom-update -a
The console window may display more messages than in the example below if the content requires updating. Any questions should be confirmed by pressing Y (Yes).
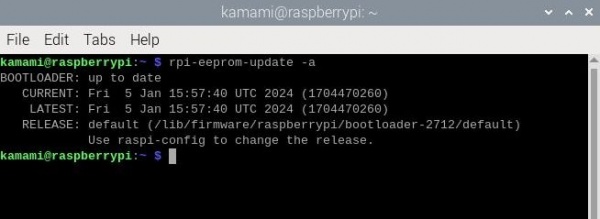
After completing the actions, it is necessary to restart the system, which we can invoke, for example, by entering the command:
sudo reboot
Installing the system on the NVME M.2 drive
With the RPi5 turned off, we mount the KAmod RPi5 M.2 mini adapter with the mounted NVME M.2 drive. We start Raspberry Pi 5, open the console window (Terminal), e.g. using the Ctrl+Alt+T key combination, and enter:
sudo rpi-imager
In the window that appears, select:
- computer model (Raspberry Pi Device): RASPBERRY PI 5,
- operating system (Operating System): RASPBERRY PI OS (64-BIT),
- disk (Storage): here we indicate the NVME M.2 disk, which was mounted in the KAmod RPi5 M.2 mini adapter.
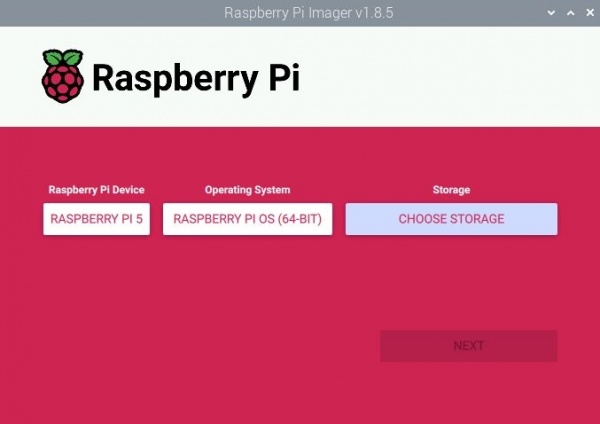
The further steps of installing the operating system image can be found in the official Raspberry Pi documentation:
https://www.raspberrypi.com/documentation/computers/getting-started.html
Finally, turn off the RPi5.
Starting the system
When we have an NVME M.2 drive mounted with the installed operating system image, before starting the Raspberry Pi 5 computer, remove the memory card from the dedicated slot - it will no longer be needed (the memory card can be removed/mounted only when the computer is turned off and disconnected from the power supply).
The first boot of the new operating system will take a little longer than the next ones, but after a while you will see the desktop of a ready-to-work Raspbian installed on the NVME M.2 drive. This is a new operating system and does not contain the changes we made to the system on the memory card. Therefore, we need to perform an operating system update, as described earlier. We do not need to update the EEPROM content - it did not change after the change of the operating system.
Increasing the speed of the PCIe interface
The PCIe interface of the Raspberry Pi 5 computer starts by default in gen 2 mode, which allows communication with a maximum throughput of 5 GT/s (Gigatransfers per second). There is a way to start gen 3 mode, which offers a throughput of up to 8 GT/s. To do this, modify the contents of the configuration file config.txt.
In the console, type:
sudo nano /boot/firmware/config.txt
(in earlier versions of the operating system, the file config.txt was placed directly in the /boot directory).
At the end of the file (scroll to the bottom with the arrows), add the line:
dtparam=pciex1_gen=3
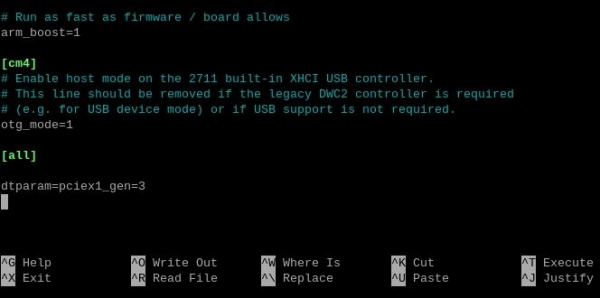
Then, save the changes using the Ctrl+O keys, close the editor using the Ctrl+X keys, and restart the system.
To check if the modification worked, you can analyze the system boot messages. Open the console window (Terminal), e.g. using the key combination Ctrl+Alt+T and enter:
dmesg | grep pcie
You will see content similar to the one in the screenshot below:
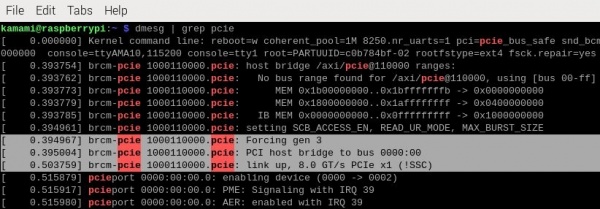
You can see the entries: "Forcing gen 3" and "Link up, 8.0 GT/s PCIe x1", which means that the modification was successful. However, this does not guarantee full system stability under all conditions.

