ZL10AVR
From Kamamilabs.com - Wiki

Introduction
ZL10AVR is a versatile evaluation board designed for engineers and hobbyists who want to prototype systems based on AVR microcontrollers (AT90S, ATmega and ATtiny families in DIP8, DIP20, DIP28 and DIP40 packages). ZL10AVR is equipped with 7 DIP sockets suitable for most of AVR family microcontrollers. LEDs mounted near sockets indicate socket suitable for selected microcontroller. Developer has access to all microcontroller pins (only one microcontroller can be installed at the same time!), which are brought to gold-pin connectors. Board's configuration is complete, user can find on the board following components: USB interface connector (for ZL1USB module), analog potentiometer, 8 MHz crystal oscillator, 4 LED displays, buzzer, RS232 interface with DB9F connector, 4x4 LED matrix, configurable keyboard (1x4 or 4x4 buttons), 8 LEDs, RC5 infrared receiver with TTL output, ISP connector and socket for LCD display (2x16 characters). Thanks to simple PLD logic (from Xilinx) incorporated on the board, most of integrated peripherals can be easy and comfortably connected to any port (PORTA, PORTB, PORTC or PORTD) available in microcontroller used in the application. The gold-pin headers provide access to easy connection of matrix keyboard and matrix display. ZL10AVR board comes with examples of Bascom programs.
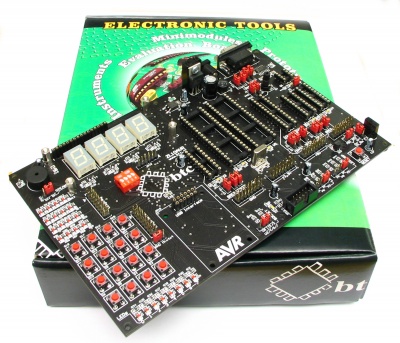
Features
- Compatible with most of AVR family microcontrollers (AT90S, ATmega, ATtiny families)
- RS232 interface (with level converter and DB9F connector)
- 4-digit, 7-segment, multiplexed LED common cathode display
- Socket for LCD 2 x16 character display (LCD1602 module)
- 8LEDs
- 16 LEDs configured as 4x4 matrix
- Configurable microswitch 4x4 or 4x1 keyboard
- Integrated infrared RC5 receiver with TTL output
- Buzzer
- Socket for USB interface (ZL1USB_A module)
- ISP Kanda STK200 compatible connector (recommended ISP programmer: ZL2PRG)
- Analog potentiometer
- Reset pulse generator
- Integrated regulated power supply
- Supply 9 VDC/250 mA
- Built-in 3,3 V voltage regulator
- Easy access to regulated +3,3 V and +5 V power supply for external devices
Supported microcontrollers
Devices supported by ZL10AVR:
- AT90: AT90S1200, AT90S2313, AT90S2323, AT90S2343
- ATtiny: ATtiny11, ATtiny12, ATtiny13, ATtiny15, ATtiny25, ATtiny26, ATtiny45, ATtiny85, ATtiny2313
- ATmega: ATmega8, ATmega16, ATmega32, ATmega48, ATmega88, ATmega161, ATmega162, ATmega163, ATmega164, ATmega168, ATmega323, ATmega324, ATmega644, ATmega8515, ATmega8535
ZL10AVR board is compatible with most of new AVR microcontrollers in DIP8/20/28 and DIP40 packages.
Contents of the package
| Code | Description |
|---|---|
| ZL10AVR |
|
Board configuration
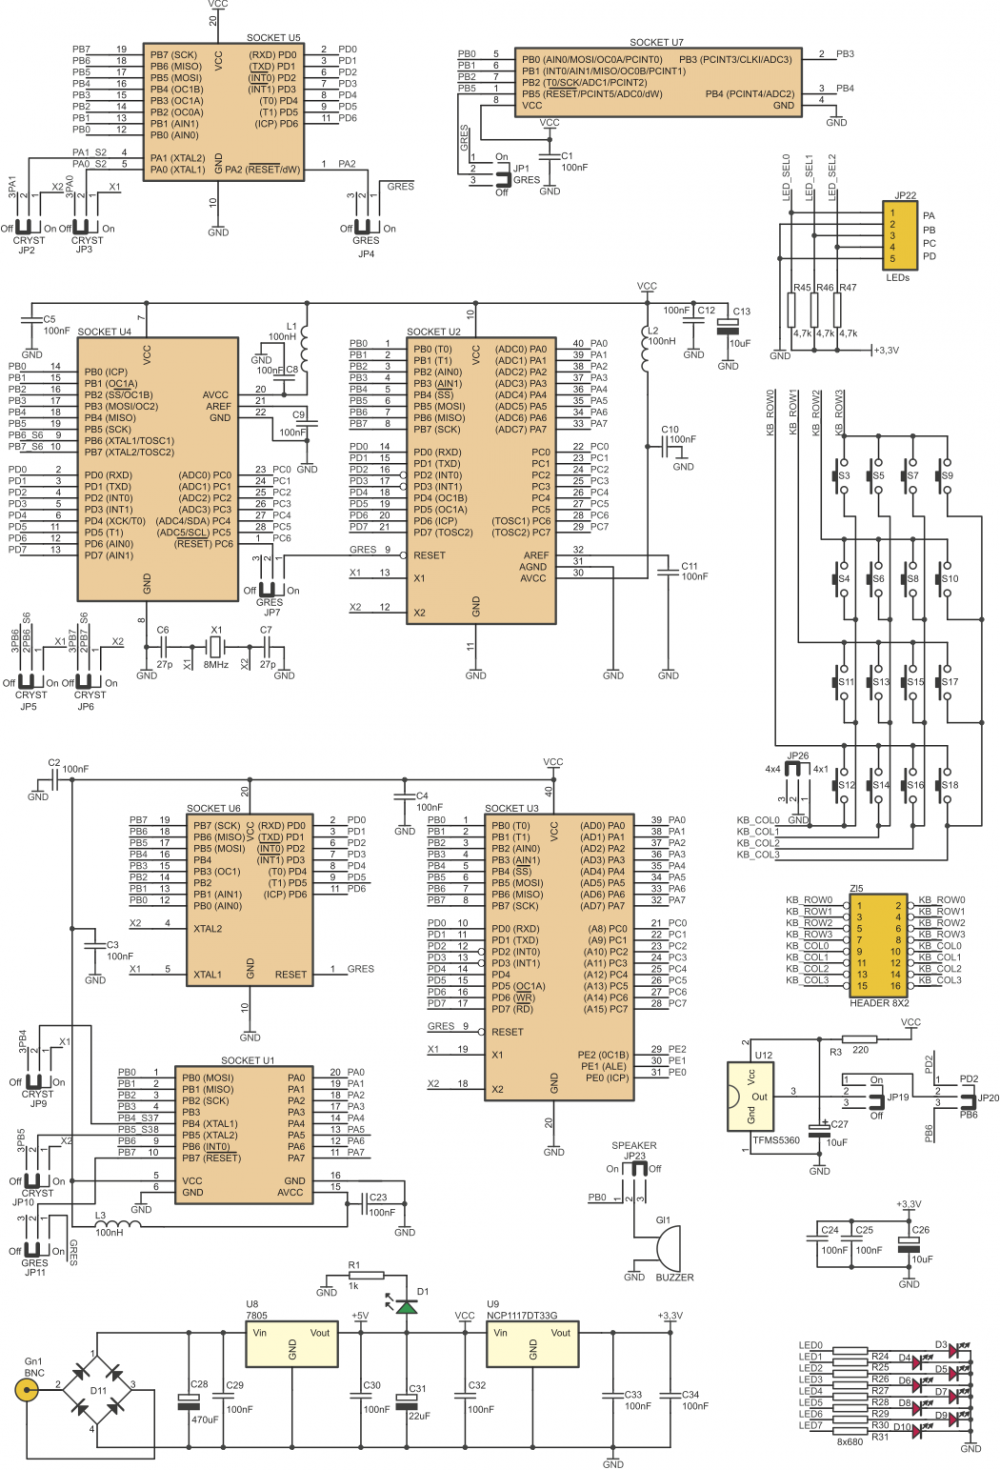
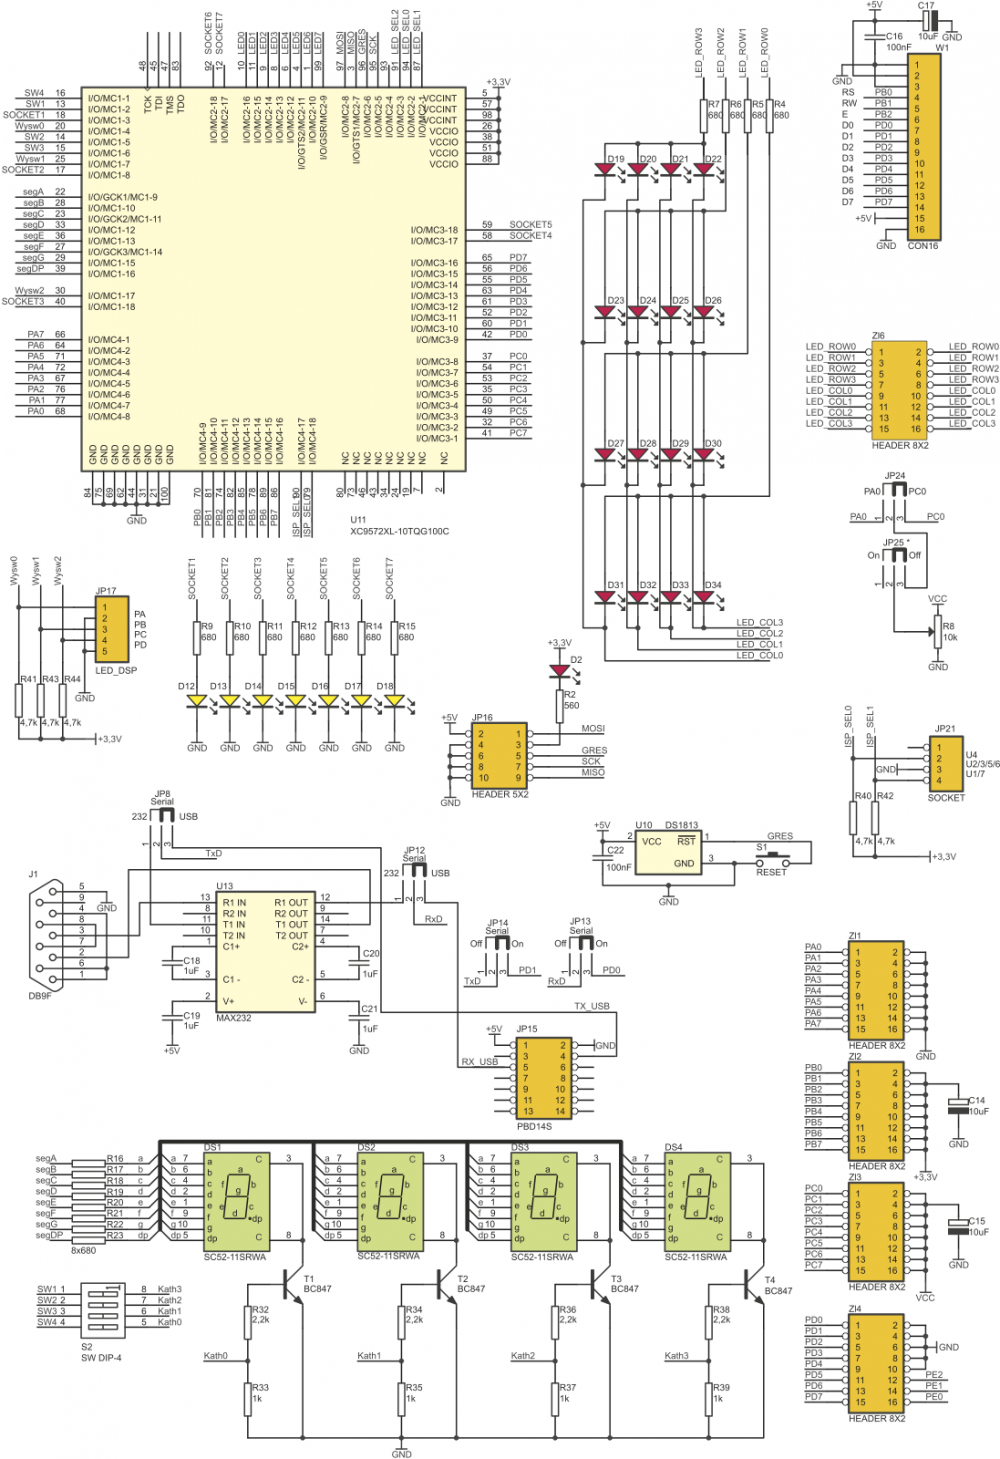
Block schematic of ZL10AVR board is shown below. Logic module integrated in CPLD works as a multiple switch simplifying connections between microcontroller’s ports and 7-segment multiplexed display, 8 LEDs and ISP con- nector.
Peripherals like: crystal resonator, potentiometer, buzzer, IR receiver, RS232 interface, USB interface can be con- nected/disconnected to/from microcontroller with few dedicated jumpers.
| Only one microcontroller at the time can be used with ZL10AVR board! |
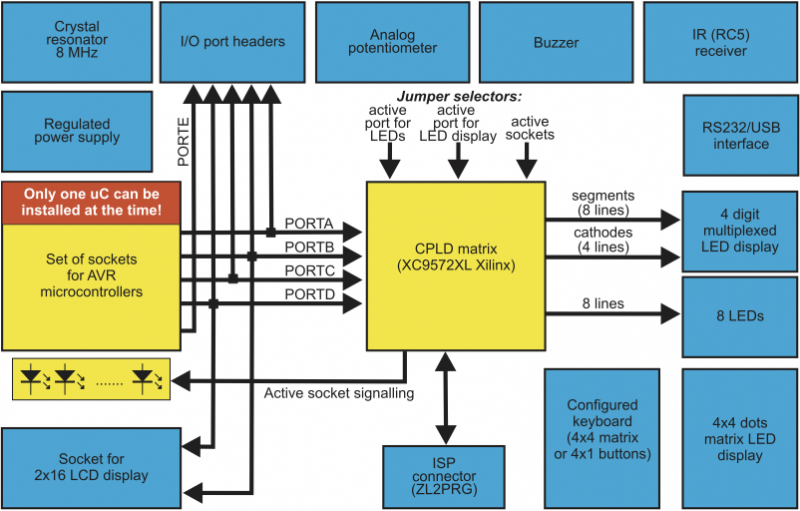
Block schematic of ZL10AVR board
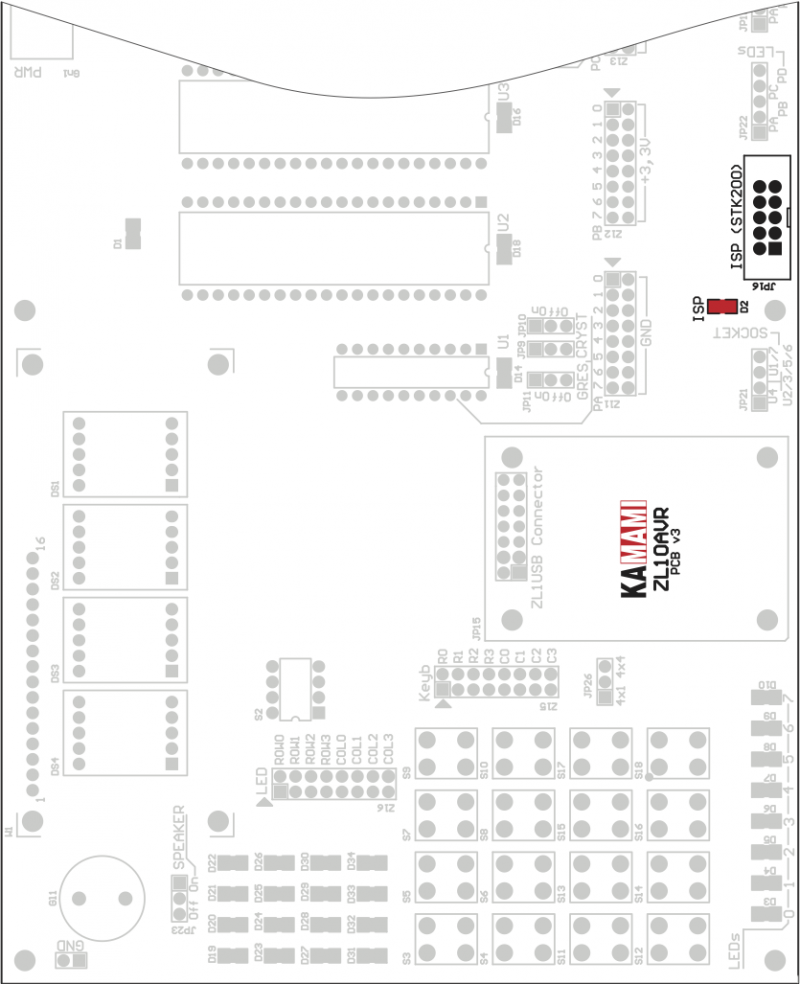
Board layout
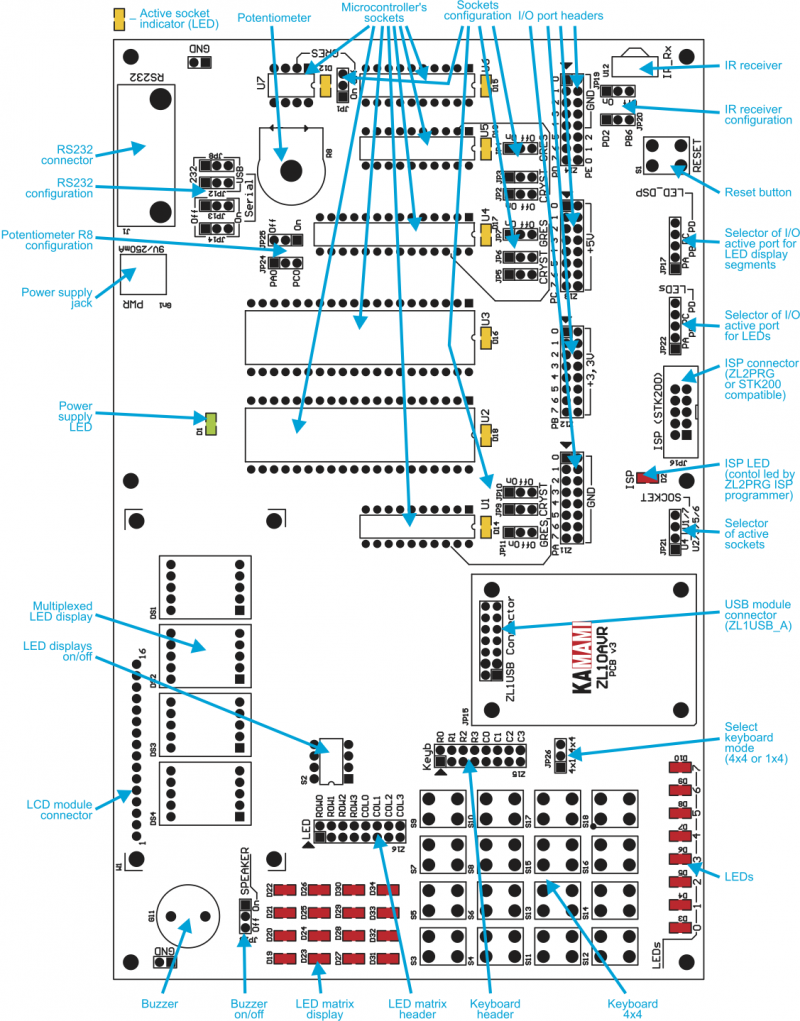
Microcontroller configuration
Active socket is selected by jumper mounted on JP21 switch.
| JP21 closed pins | Activ sockets |
|---|---|
| 1-2 | U4 |
| 2-3 | U2, U3, U5, U6 |
| 3-4 | U1, U7 |
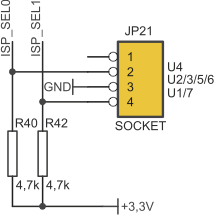
Active (selected) socket is indicated by LED. Microcontrollers that can be used with specific sockets are shown below.
| Socket | Microcontroller |
|---|---|
| U1 | ATtiny 26 |
| U2 | ATmega 32, ATmega 323, ATmega 16, ATmega 163, ATmega 8535, ATmega 164, ATmega 324, ATmega 644 |
| U3 | ATmega 8515, ATmega 161, ATmega 162 |
| U4 | ATmega 8, ATmega 48, ATmega 88, ATmega 168 |
| U5 | ATtiny 2313 |
| U6 | AT90S1200, AT90S2313 |
| U7 | ATtiny 11, ATtiny 12, ATtiny 13, ATtiny 15, ATtiny 25, ATtiny 45, ATtiny 85, AT90S2323, AT90S2343 |
Note! ATtiny 11/15 are not ISP programmable.

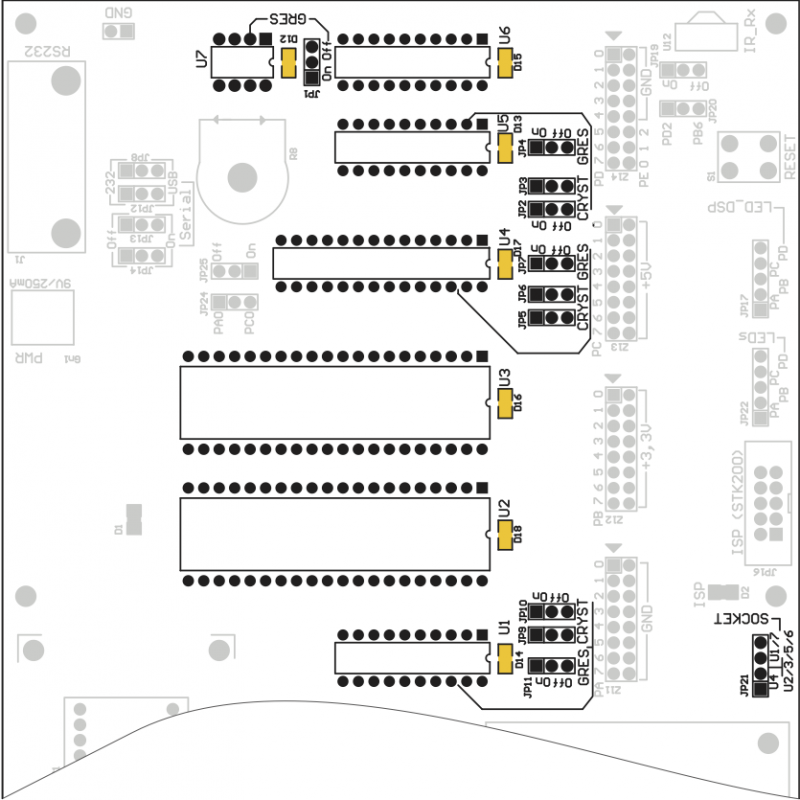
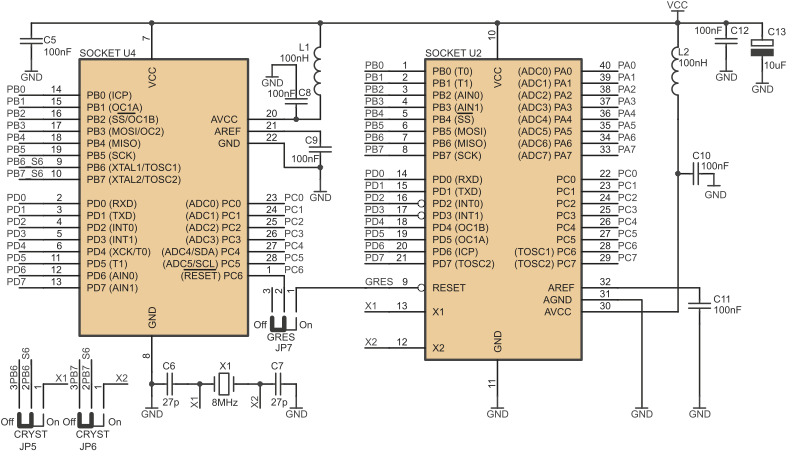
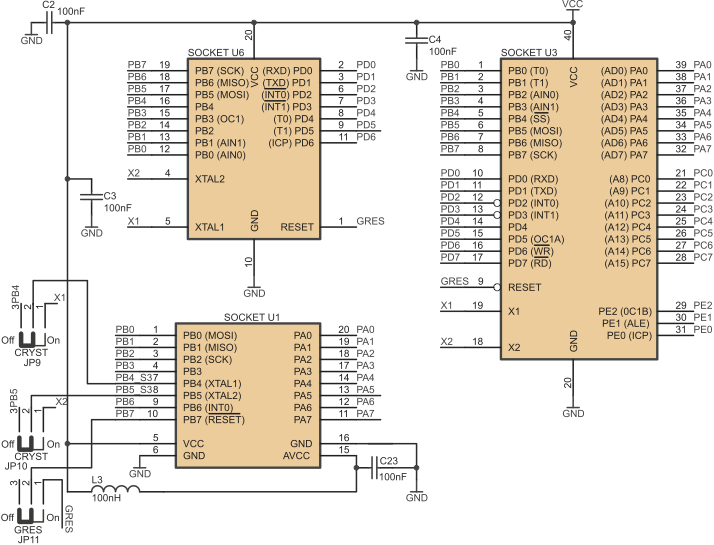
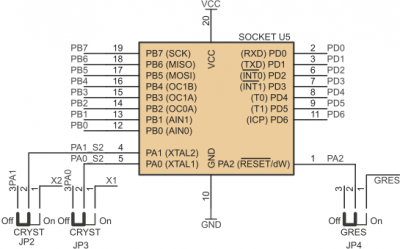
Crystal oscillator can be disconnected from X1 and X2 pins in U1, U4 and U5 sockets. Recommended configurations of jumpers JP9, JP10 (U1 socket), JP2, JP3 (U5 socket) and JP5, JP6 (U4 socket) are shown below.
Jumpers ascribed to U1 crystal pins
| JP9 closed pins | JP10 closed pins | Crystal X1... |
|---|---|---|
| 1-2 | 1-2 | ...connected to X1 i X2 of U3 socket |
| 2-3 | 2-3 | ...disconnected |
| 1-2 | 2-3 | Not allowed |
| 2-3 | 1-2 | Not allowed |
Jumpers ascribed to U4 crystal pins
| JP5 closed pins | JP6 closed pins | Crystal X1... |
|---|---|---|
| 1-2 | 1-2 | ...connected to X1 i X2 of U6 socket |
| 2-3 | 2-3 | ...disconnected |
| 1-2 | 2-3 | Not allowed |
| 2-3 | 1-2 | Not allowed |
Jumpers ascribed to U5 crystal pins
| JP2 closed pins | JP3 closed pins | Crystal X1... |
|---|---|---|
| 1-2 | 1-2 | ...connected to X1 i X2 of U2 socket |
| 2-3 | 2-3 | ...disconnected |
| 1-2 | 2-3 | Not allowed |
| 2-3 | 1-2 | Not allowed |
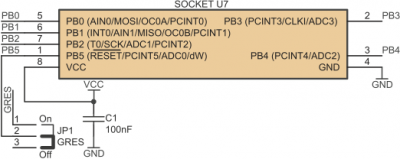
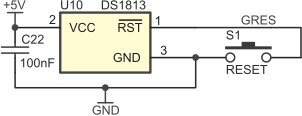
Jumpers JP1 (socket U7), JP4 (socket U5), JP7 (socket U4) and JP11 (socket U1) are used to connect microcon- troller /RESET input to reset signal generator (U10), manual reset button S1 and /RESET signal generated by ISP programmer. Recommended configurations of these jumpers are shown below.
Configurations of JP1
| JP1 closed pins | External (global) /RESET signal... |
|---|---|
| 1-2 | ...connected to U7 |
| 2-3 | ...disconnected from U7 |
Configurations of JP4
| JP4 closed pins | External (global) /RESET signal... |
|---|---|
| 1-2 | ...connected to U5 |
| 2-3 | ...disconnected from U5 |
Configurations of JP7
| JP7 closed pins | External (global) /RESET signal... |
|---|---|
| 1-2 | ...connected to U4 |
| 2-3 | ...disconnected from U4 |
Configurations of JP11
| JP11 closed pins | External (global) /RESET signal... |
|---|---|
| 1-2 | ...connected to U1 |
| 2-3 | ...disconnected from U1 |
| Only one (active) socket can be connected to crystal generator and global /RESET signal. In other case microcontroller will work incorrectly! |
Examples of board configurations
ATmega32, external resonator
Microcontroller in U2 socket. Jumpers configuration:
JP21 (SOCKET) – 2-3 (U2/3/5/6)
JP11 (U1 GRES) – 2-3 (Off)
JP9 (U1 CRYST) – 2-3 (Off)
JP10 (U1 CRYST) – 2-3 (Off)
JP5 (U4 CRYST) – 2-3 (Off)
JP6 (U4 CRYST) – 2-3 (Off)
JP7 (U4 GRES) – 2-3 (Off)
JP2 (U5 CRYST) – 2-3 (Off)
JP3 (U5 CRYST) – 2-3 (Off)
JP4 (U5 GRES) – 2-3 (Off)
JP1 (U7 GRES) – 2-3 (Off)
ATtiny2313, external resonator
Microcontroller in U5 socket. Jumpers configuration:
JP21 (SOCKET) – 2-3 (U2/3/5/6)
JP11 (U1 GRES) – 2-3 (Off)
JP9 (U1 CRYST) – 2-3 (Off)
JP10 (U1 CRYST) – 2-3 (Off)
JP5 (U4 CRYST) – 2-3 (Off)
JP6 (U4 CRYST) – 2-3 (Off)
JP7 (U4 GRES) – 2-3 (Off)
JP2 (U5 CRYST) – 1-2 (On)
JP3 (U5 CRYST) – 1-2 (On)
JP4 (U5 GRES) – 1-2 (On)
JP1 (U7 GRES) – 2-3 (Off)
ATtiny2313, internal oscillator
Microcontroller in U5 socket. Jumpers configuration:
JP21 (SOCKET) – 2-3 (U2/3/5/6)
JP11 (U1 GRES) – 2-3 (Off)
JP9 (U1 CRYST) – 2-3 (Off)
JP10 (U1 CRYST) – 2-3 (Off)
JP5 (U4 CRYST) – 2-3 (Off)
JP6 (U4 CRYST) – 2-3 (Off)
JP7 (U4 GRES) – 2-3 (Off)
JP2 (U5 CRYST) – 2-3 (Off)
JP3 (U5 CRYST) – 2-3 (Off)
JP4 (U5 GRES) – 1-2 (On)
JP1 (U7 GRES) – 2-3 (Off)
ATmega8, external resonator
Microcontroller in U4 socket. Jumpers configuration:
JP21 (SOCKET) – 1-2 (U4)
JP11 (U1 GRES) – 2-3 (Off)
JP9 (U1 CRYST) – 2-3 (Off)
JP10 (U1 CRYST) – 2-3 (Off)
JP5 (U4 CRYST) – 1-2 (On)
JP6 (U4 CRYST) – 1-2 (On)
JP7 (U4 GRES) – 1-2 (On)
JP2 (U5 CRYST) – 2-3 (Off)
JP3 (U5 CRYST) – 2-3 (Off)
JP4 (U5 GRES) – 2-3 (Off)
JP1 (U7 GRES) – 2-3 (Off)
7-segment LED display
Segments of LED displays can be controlled by one of four microcontroller I/O ports (8 lines each): PORTA, PORTB, PORTC or PORTD. Active port is selected by JP17 (LED_DSP) simultaneously with display’s cathodes drivers. Cathodes are controlled by 4 LSB lines of PORTA, PORTB, PORTC or PORTD.
LED displays port selection (JP17 - LED_DSP)
| JP17 closed pins | Segments controlled by... | Cathodes controlled by (MSD...LSD)... |
|---|---|---|
| 1-2 | …PA | ...PB(3...0) |
| 2-3 | …PB | ...PC(3...0) |
| 3-4 | …PC | ...PD(3...0) |
| 4-5 | …PD | ...PA(3...0) |
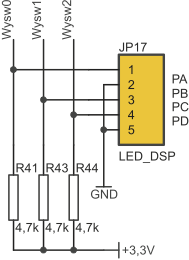
Displays segments are connected to I/O port lines as shown below.
Connection of LED diplays segments
| Displays segment | I/O line (x=A/B/C/D) |
|---|---|
| A | Px0 |
| B | Px1 |
| C | Px2 |
| D | Px3 |
| E | Px4 |
| F | Px5 |
| G | Px6 |
| DP | Px7 |
DIP-switch S2 selects number of active displays (non-active displays can be switched-off).
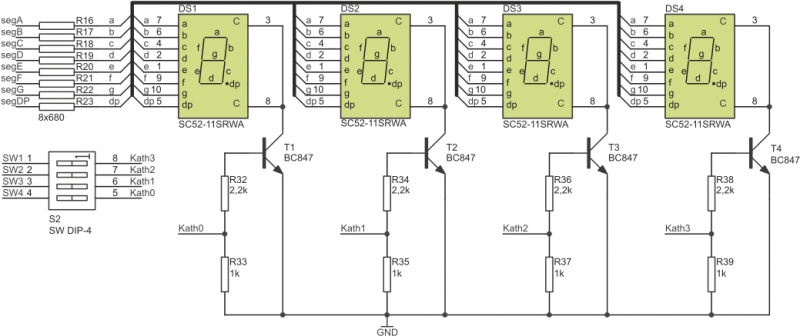
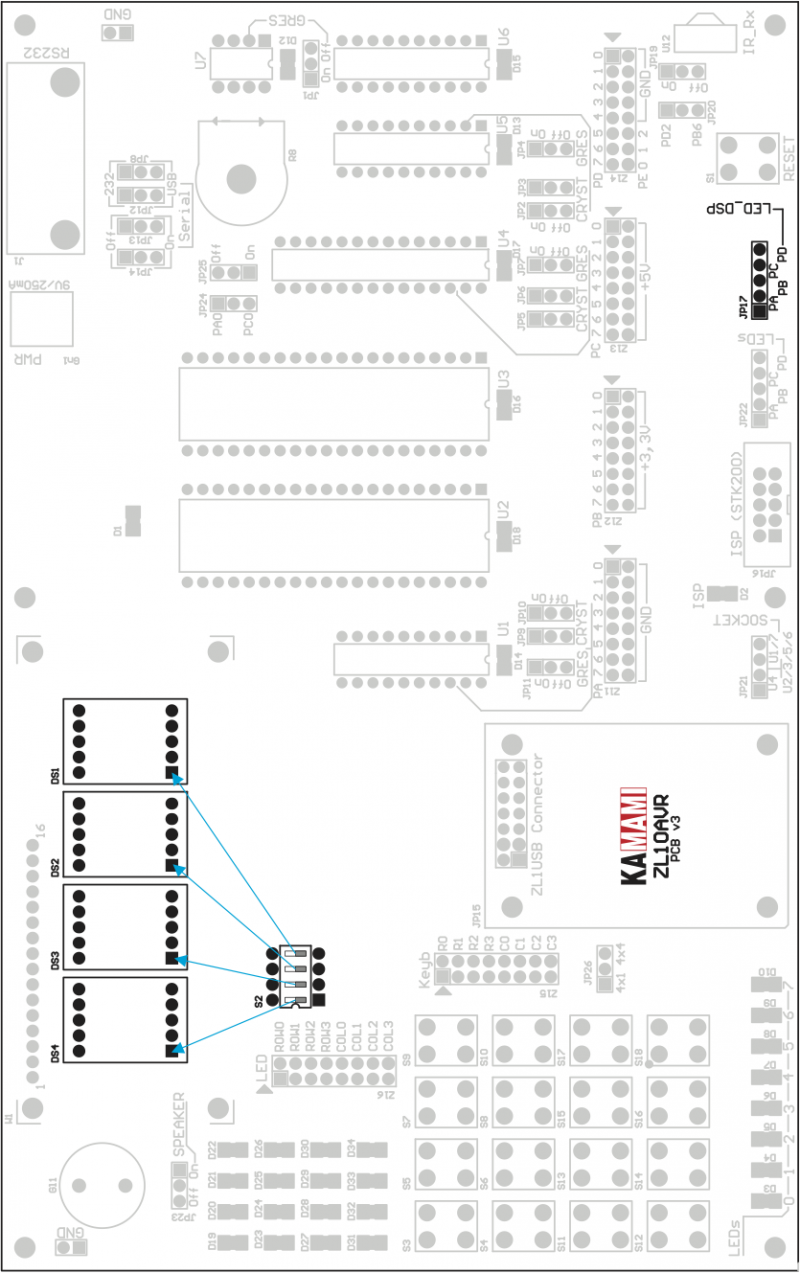
LEDs
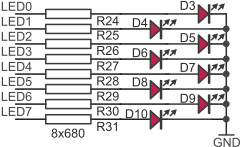
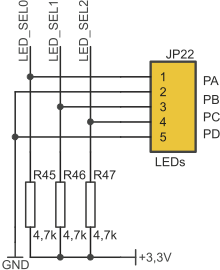
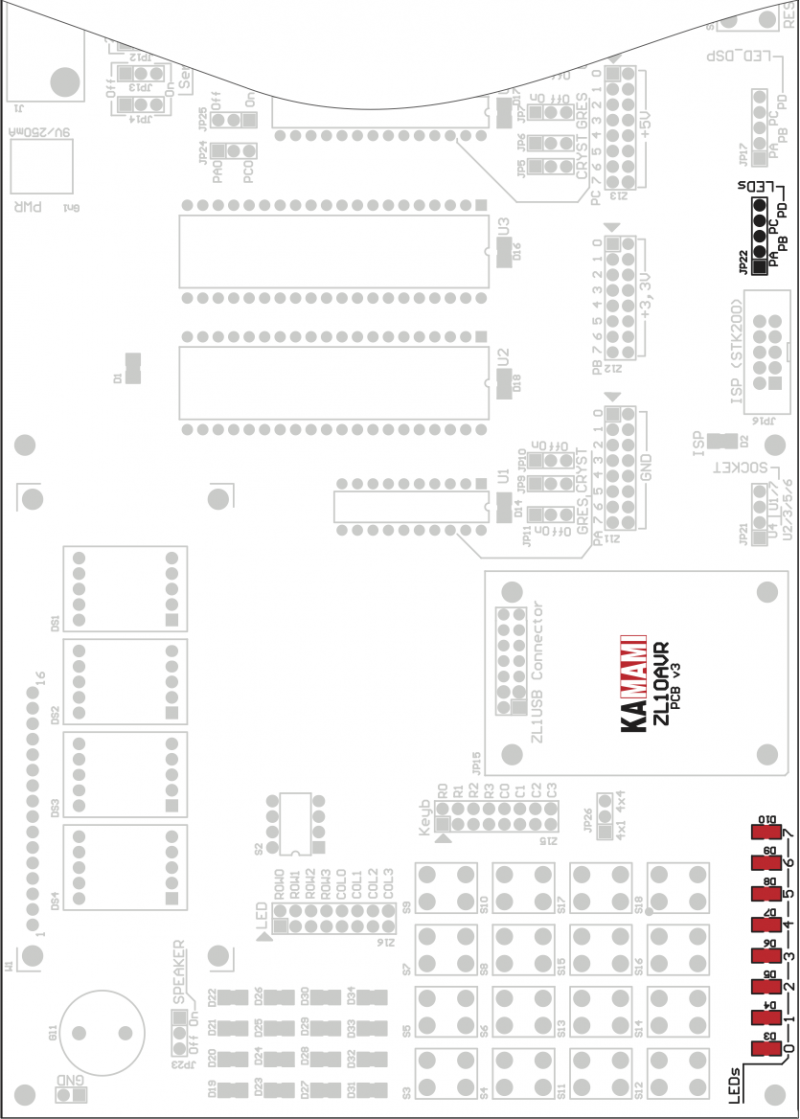
LEDs can be connected to one of four ports: PORTA, PORTB, PORTC or PORTD. Active port is selected by JP22.
| JP22 closed pins | LEDs controlled by... |
|---|---|
| 1-2 | ...PA |
| 2-3 | ...PB |
| 3-4 | ...PC |
| 4-5 | ...PD |
Alphanumeric LCD display
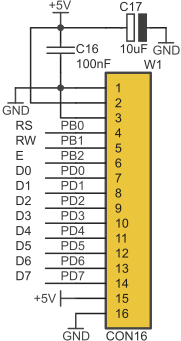
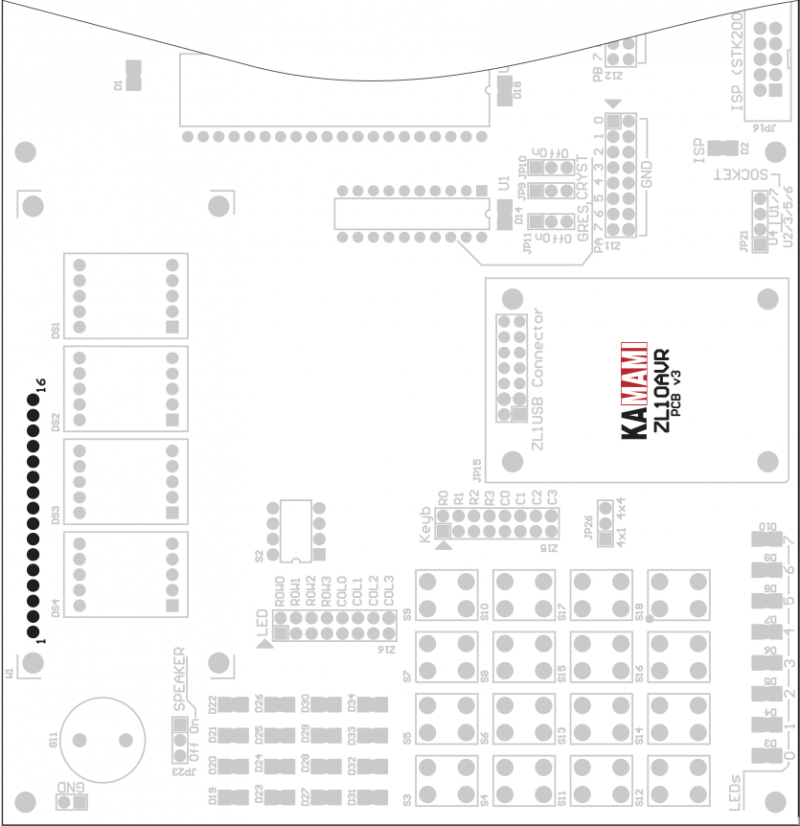
Standard LCD display with HD44780 compatible controller (LCD1602 module) can be mounted in W1 socket. Connections between microcontroller and display module lines are show below.
Connections between microcontroller and display module
| LCD module signal name | LCD module pin | AVR I/O lines |
|---|---|---|
| RS | 4 | PB0 |
| RW | 5 | PB1 |
| E | 6 | PB2 |
| D0 | 7 | PD0 |
| D1 | 8 | PD1 |
| D2 | 9 | PD2 |
| D3 | 10 | PD3 |
| D4 | 11 | PD4 |
| D5 | 12 | PD5 |
| D6 | 13 | PD6 |
| D7 | 14 | PD7 |
Analog potentiometer
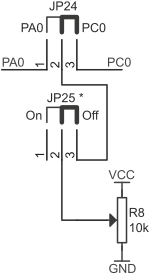
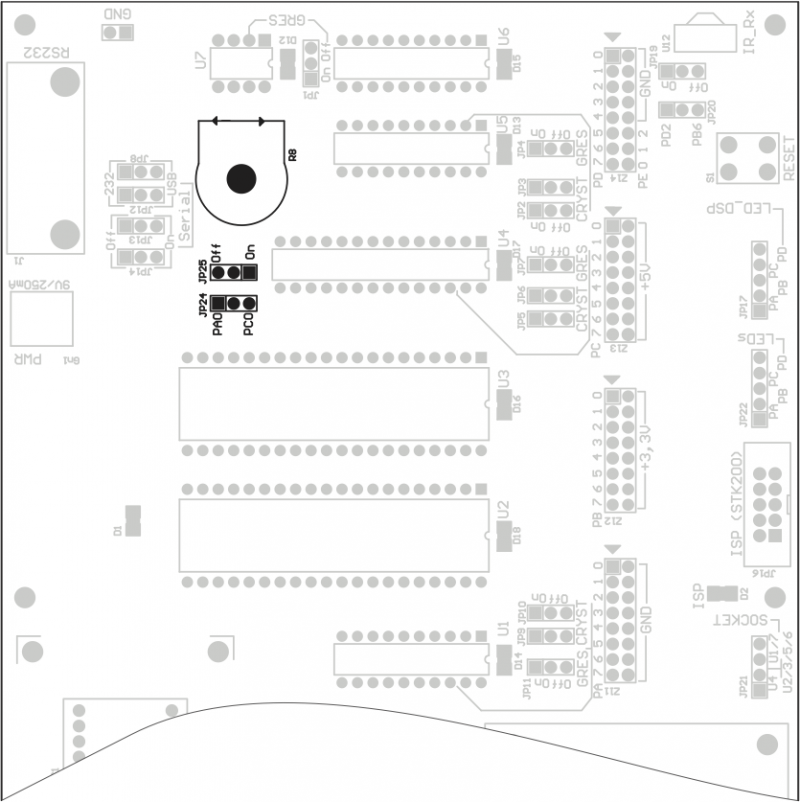
ZL10AVR board is equipped with analog potentiometer R8 allowing to regulate select form 0 up to +5 V. Potentiometer can be connected to analog input on line PA0 or PC0 as shown below.
| JP24 closed pins | JP25 closed pins (*) | Potentiometer R8... |
|---|---|---|
| 1-2 | 1-2 | …disconnected |
| 1-2 | 2-3 | ...connected to PA0 |
| 2-3 | 1-2 | ...disconnected |
| 2-3 | 2-3 | ...connected to PC0 |
(*) There is an error on Top Overlay: potentiometer R8 is disconnected, when jumper JP25 is in position On (closed pins 1-2). Potentiometer R8 is connected, when jumper JP25 is in position Off (closed pins 2-3).
Buzzer
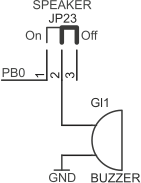
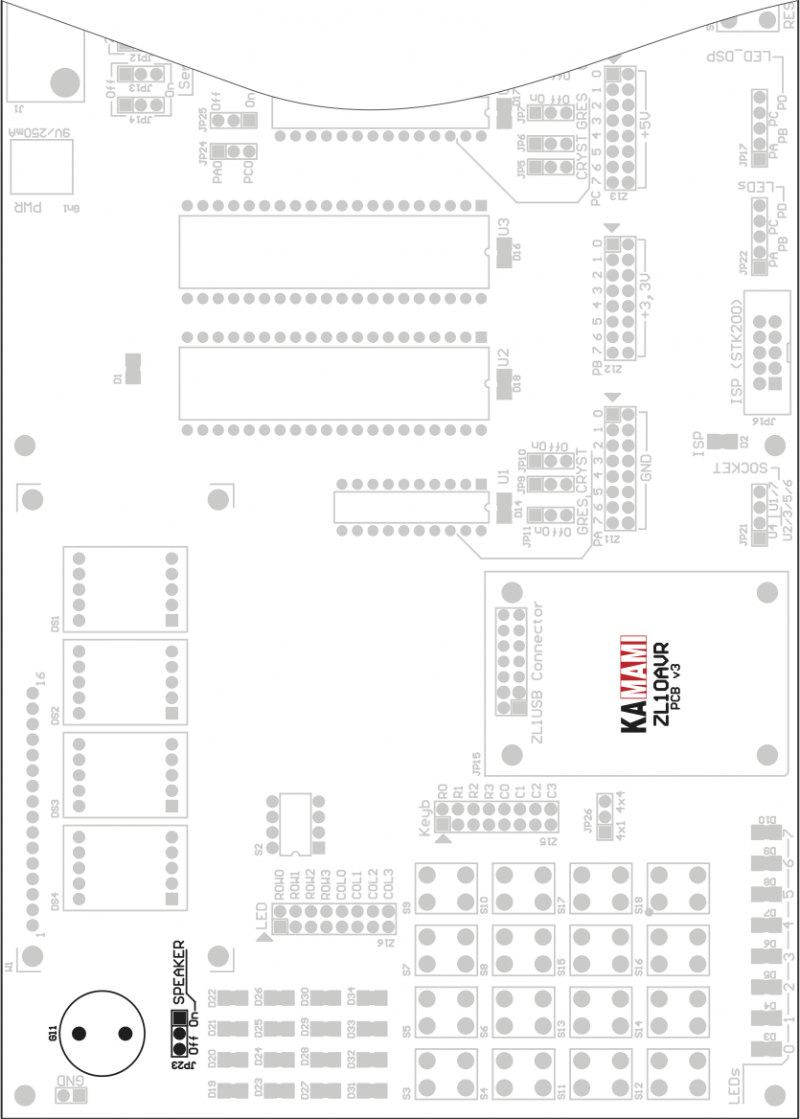
Buzzer Gl1 can be connected to PB0 line. Jumper JP23 (SPEAKER) disconnects buzzer.
| JP23 closed pins | Gl1… |
|---|---|
| 1-2 (On) | ...connected to PB0 |
| 2-3 (Off) | ...disconnected |
RS232/USB interface
ZL10AVR board is equipped with:
- DB9F connector connected to MAX232-compatible voltage converter (RS232 interface),
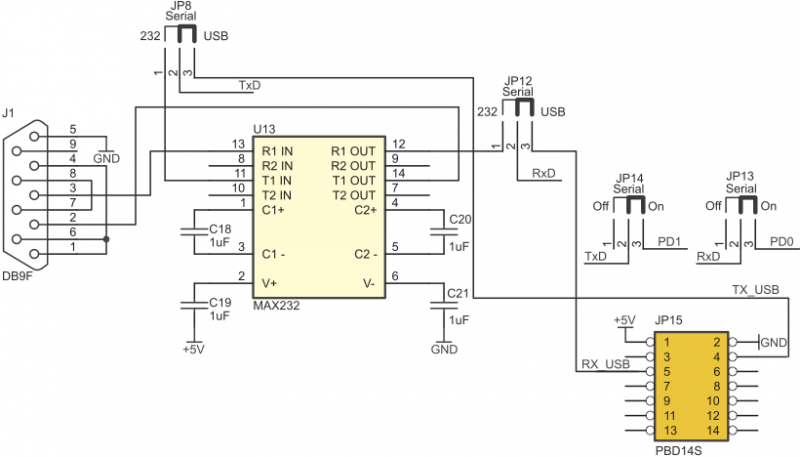
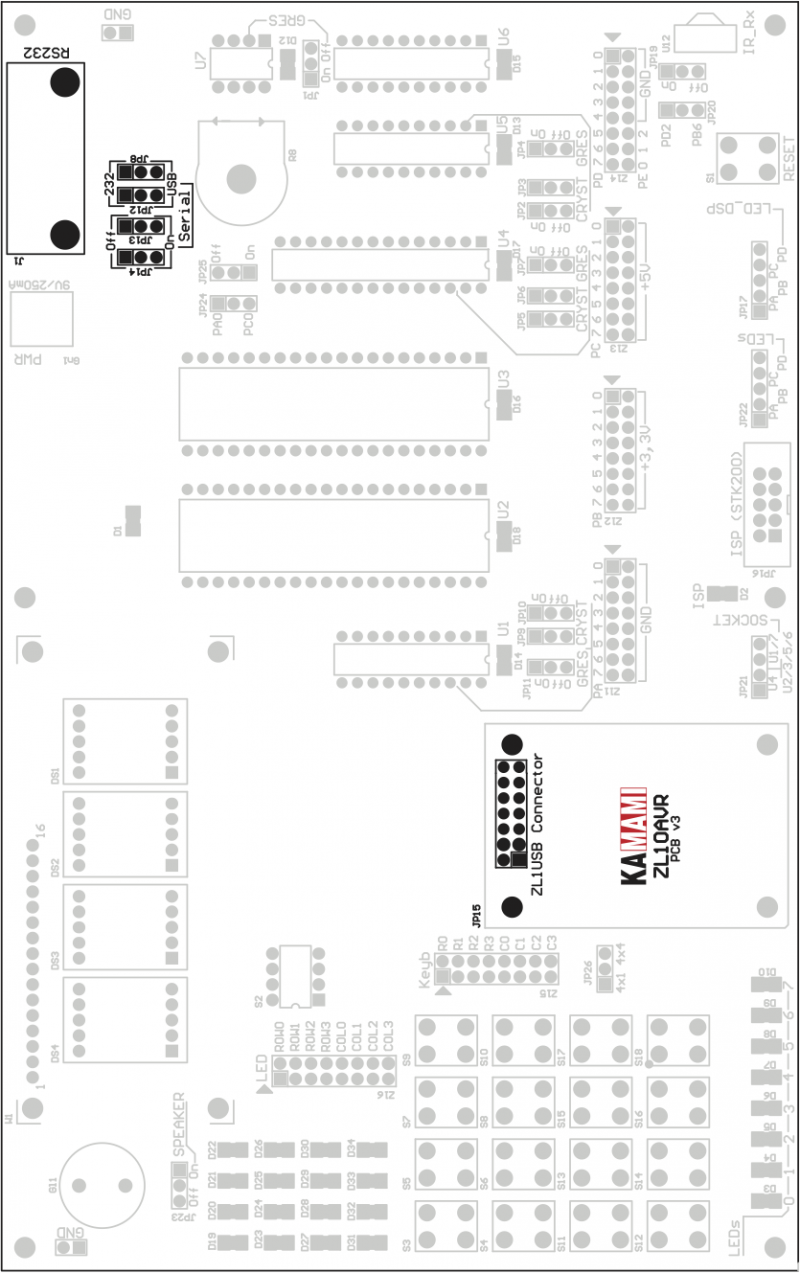
- JP15 socket for USB2RS232 interface module (recommended type is ZL1USB). Serial interfaces are configured by JP8, JP12, JP13 and JP14 jumpers.
Serial ports configurations
| JP8 closed pins | JP12 closed pins | Selected… | JP13 closed pins | JP14 closed pins | TxD… | RxD… | Configuration |
|---|---|---|---|---|---|---|---|
| - | - | - | 1-2 | 1-2 | …disconnected | …disconnected | Serial interface disconnected |
| - | 1-2 | ...channel RxD RS232 | 1-2 | 2-3 | …disconnected | ...connected to PD0 | - |
| - | 2-3 | ...channel RxD USB | 1-2 | 2-3 | disconnected | ...connected to PD0 | - |
| 1-2 | - | ...channel TxD RS232 | 2-3 | 1-2 | ...connected to PD1 | ...disconnected | - |
| 2-3 | - | ...channel TxD USB | 2-3 | 1-2 | ... connected to PD1 | ...disconnected | - |
| 1-2 | 1-2 | RS232 (TxD and RxD) | 2-3 | 2-3 | ...connected to PD1 | ...connected to PD0 | RS232 interface connected to microcontroler |
| 2-3 | 2-3 | ...USB (TxD and RxD) | 2-3 | 2-3 | ... connected to PD1 | ...connected to PD0 | USB2RS232 interface connected to microcontroler |
IR receiver
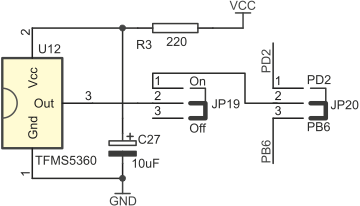
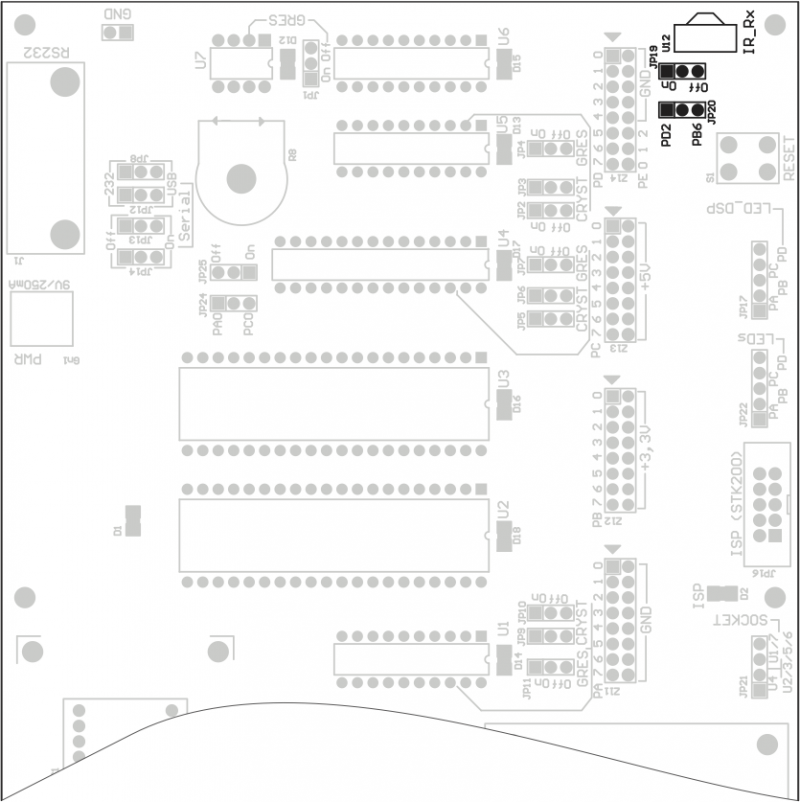
ZL10AVR board is equipped with TFMS5360 (U12) IR receiver. Possible connections of its output are shown below.
Configurations of JP19 and JP20
| JP19 closed pins | JP20 closed pins | IR receiver output... |
|---|---|---|
| 1-2 | 1-2 | ...connected to PD2 |
| 1-2 | 2-3 | ...connected to PB6 |
| 2-3 | - | ...disconnected |
| 2-3 | 2-3 | ...connected to PC0 |
Matrix LED display
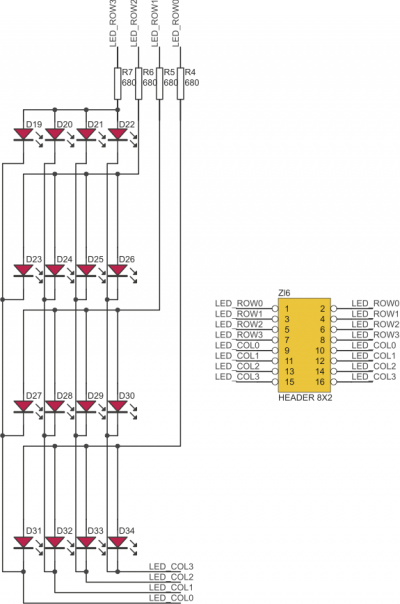
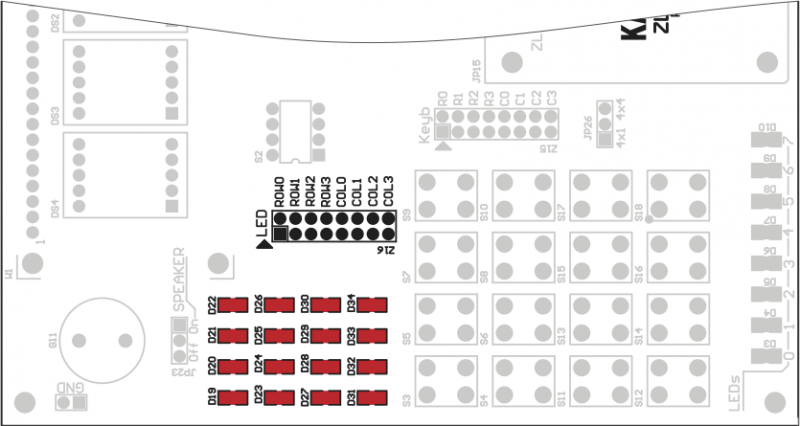
Matrix (4x4 LEDs) LED display mounted on the ZL10AVR is connected to I/O port with 16 wires IDC ribbon ca- ble (not included). Connections of rows and columns of LEDs matrix is shown below. We recommend to use only one LED in each row at the time, to avoid lumination intensity modulation.
Microswitch keyboard
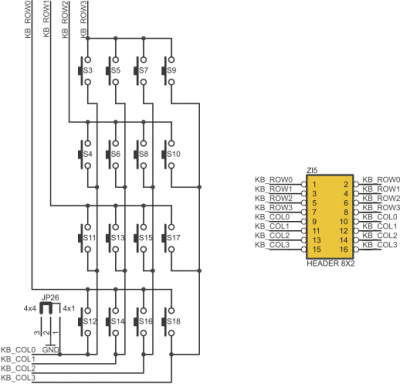
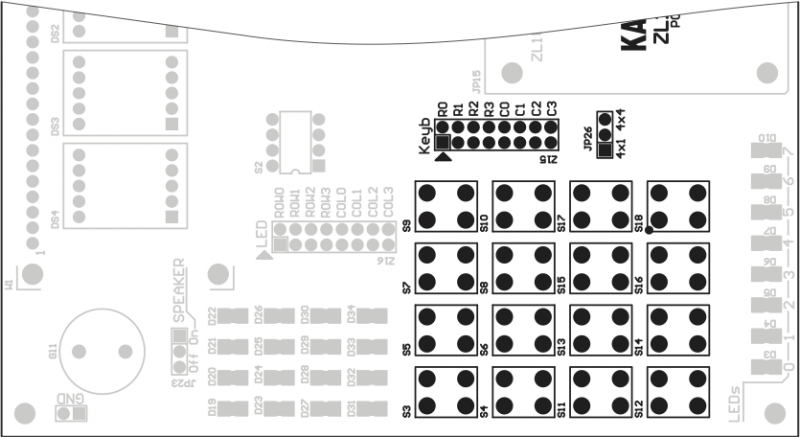
ZL10AVR board is equipped with 16 microswitches connected as 4x4 matrix or simple 4x1 keyboard (with „0” logic level active). Keyboard can be connected to any accesible I/O microcontroller port with IDC ribbon cable (zl5 gold-pin header).
Configurations of JP26
| JP26 closed pins | Keyboard configuration is... |
|---|---|
| 1-2 | ...simply 4 x 1 switches |
| 2-3 | ...matrix 4 x 4 |
I/O headers
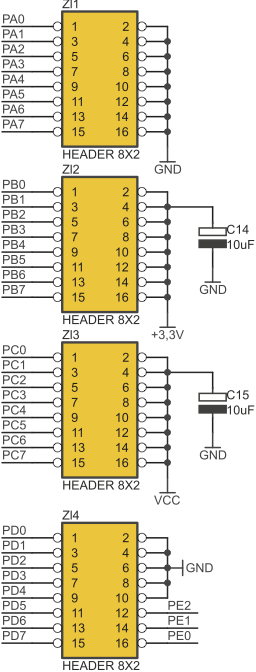
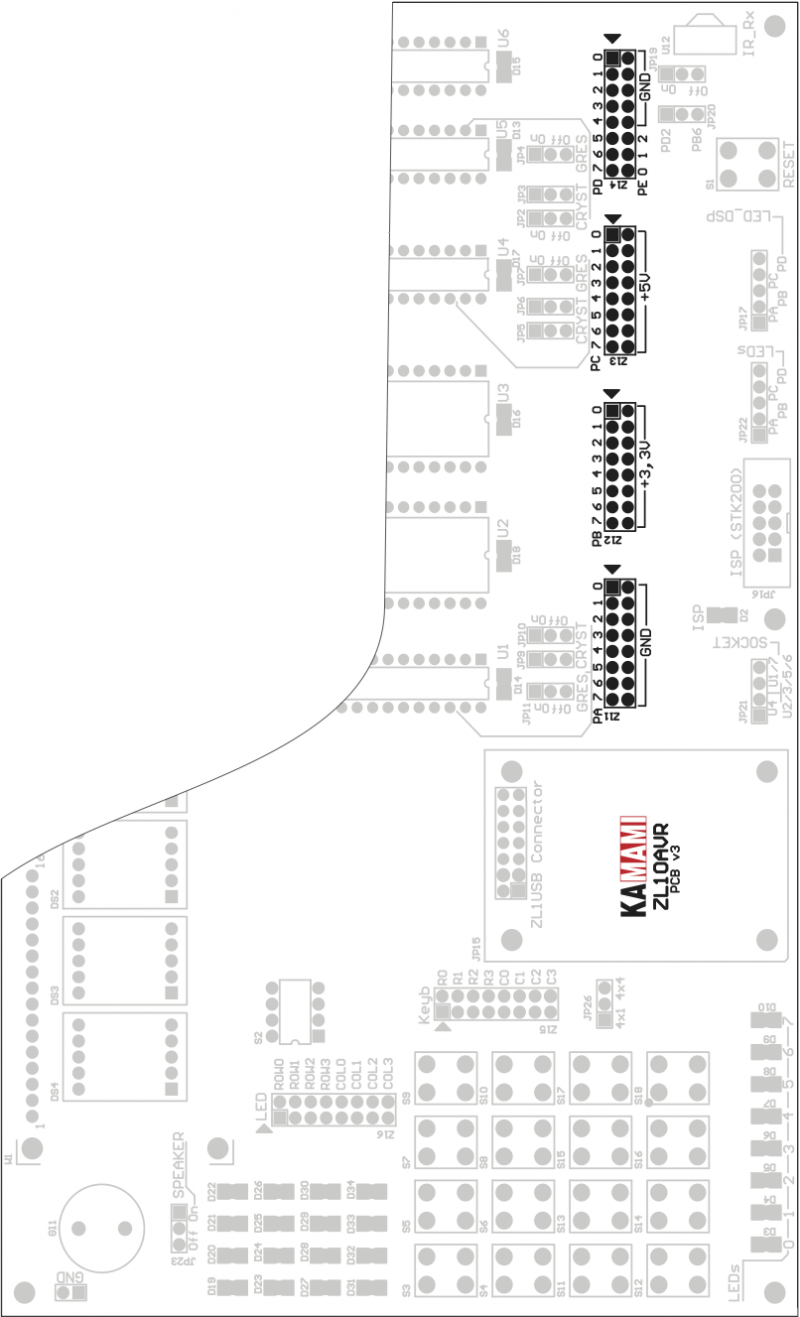
ISP connector
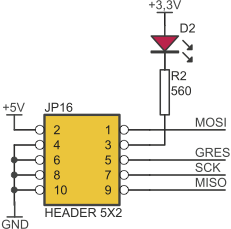
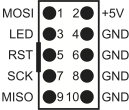
Pin layout of ISP connector (JP16, Kanda STK200 compatible) is shown below. Kamami recommends using ZL2PRG ISP programmer (for PC with parallel port) or KamProg for AVR (for PCs with USB).
Schematics
