KAmodRPi5 PCIe-M.2v2
From Kamamilabs.com - Wiki

Description
KAmodRPi5 PCIe-M.2v2 - NVME M.2 M-Key Drive Adapter for Raspberry Pi 5
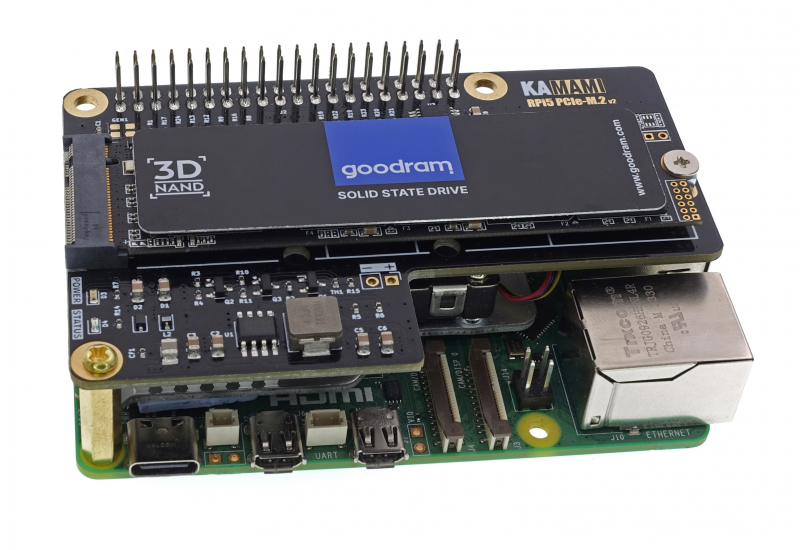
The Raspberry Pi 5 computer is equipped with a PCI Express interface led out to a custom, miniature FFC connector marked on the board as PCIe. It allows you to connect modern SSDs that support the fast and reliable NVME protocol, and then the Raspberry Pi can become a multimedia center or file server, while maintaining a small size and energy efficiency. This requires the use of the KAmod RPi5 PCIe-M.2v2 adapter, which allows you to connect an NVME drive with an M.2 M-key connector, up to 2280 in size.
Basic parameters
- The adapter is designed for easy installation on the Raspberry Pi 5 board
- Connection to the Raspberry Pi 5 computer via the 40-pin GPIO connector and FFC 16/0.5 tape (optionally, connection using FFC tape only is possible)
- Allows you to connect additional HAT modules to the 40-pin GPIO connector
- Allows you to connect an NVME drive with an M.2 M-key (NGFF M-key) connector
- Communication via the PCI Express Gen2 x1 interface (optionally also Gen3 x1)
- Allows you to mount a 2230, 2242, 2260 or 2280 drive
- It supplies a voltage of 3.3 V and a maximum current of 3 A to power the drive. The current efficiency depends on the power of the power supply connected to the Raspberry Pi - recommended: 5.1 V, at least 3.0 A (15 W)
- LED indicators signaling correct power supply and disk activity
- Dimensions: 56x87.5 mm
- The adapter design does not block the possibility of using a radiator with a fan dedicated to Raspberry Pi 5 - Raspberry Pi Active Cooler
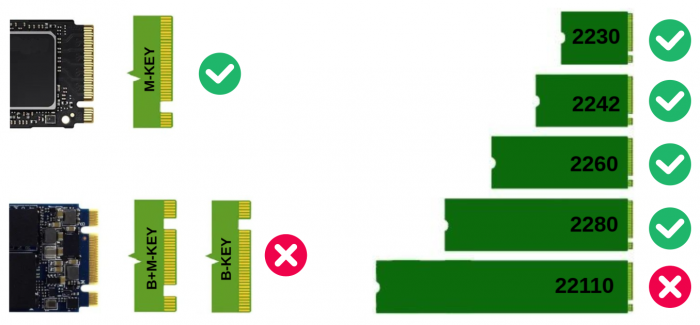
Not every NVME M.2 disk is compatible with the Raspberry Pi 5 computer
- Tested and working disk models include:
- Goodram PX500 (256 GB, 2280)
- Goodram PX600 (256 GB, 2280)
- Samsung 980 (500 GB, 2280)
- Samsung PM991a (256GB, 2242)
- Patriot P310 (240GB, 2280)
- WD SN530 (256GB, 2242)
Standard Equipment
| Code | Description |
|---|---|
|
|
|
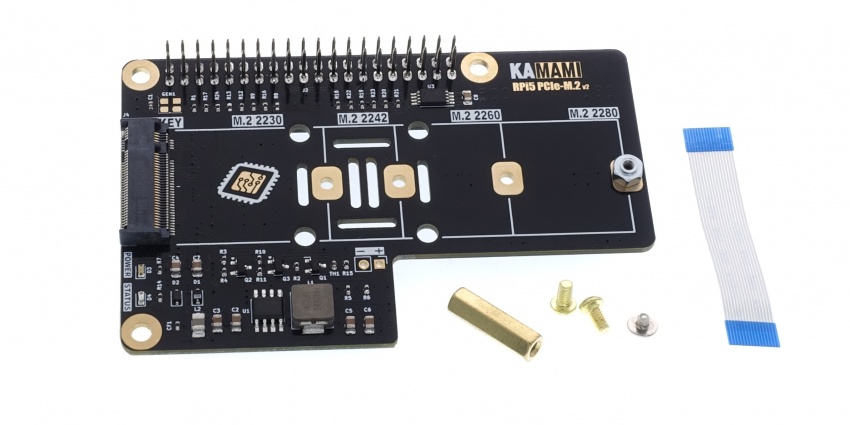
Description of the most important elements
PCI Express connector
| Connector | Description |
|---|---|
|
J1 - RPi5 PCIe |
(the adapter can work when connected to the Raspberry Pi 5 only with the ribbon cable, if the drive does not draw more than 1 A) |
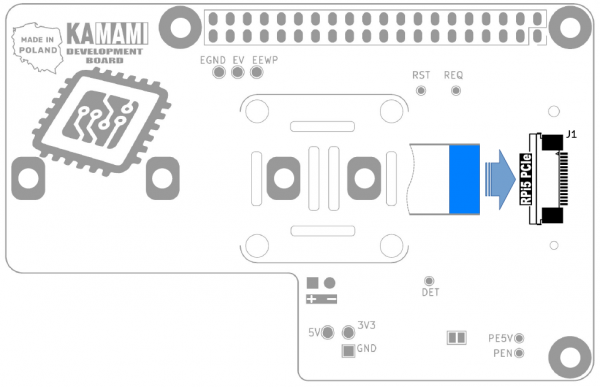
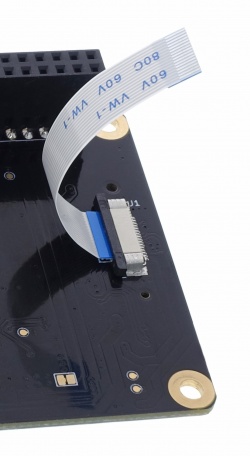
The PCI Express connector of the KAmodRPi5 PCIe-M.2v2 adapter is located on the bottom side of the board (bottom side - J1). It should be connected to the PCIe connector on the Raspberry Pi 5 board using an FFC 16/0.5 connecting ribbon cable.
The ribbon cable should be inserted from the center of the board, with the contacts aligned to the board plane - i.e. the blue marker must be on the outside, as shown in the figure below. Before inserting the ribbon cable into the connector, gently move the lock on the J1 connector (dark element) - by about 2 mm. After inserting the ribbon, gently push the lock in so that the ribbon is locked in the connector.
NVME M.2 M-key Drive Connector
| Connector | Description |
|---|---|
|
J4 - M.2 M-KEY |
|
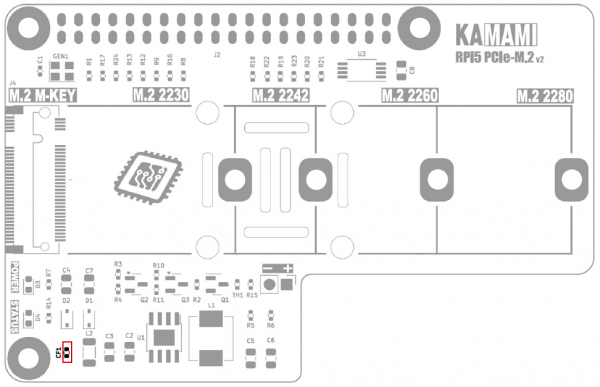
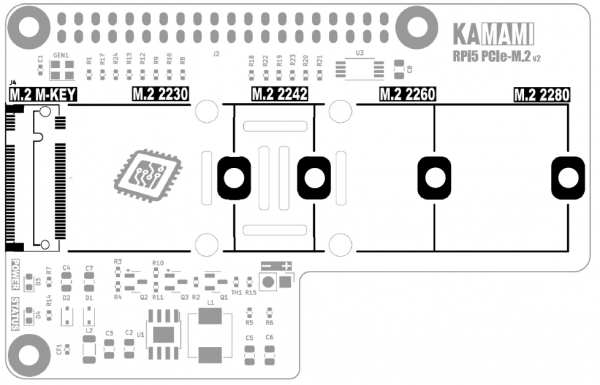
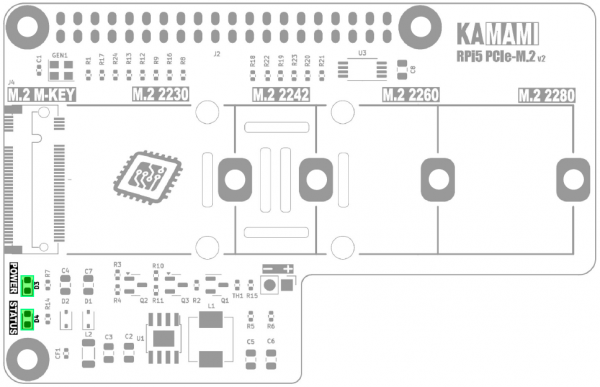
The J4 M.2 connector with an “M” type key (M-KEY) allows you to connect a standard NVME drive. The set of holes on the board allows for stable mounting of drives in sizes 2230, 2242, 2260 or 2280.
GPIO Connector
| Connector | Description |
|---|---|
|
J2 - Goldpin male-female connector, high |
|
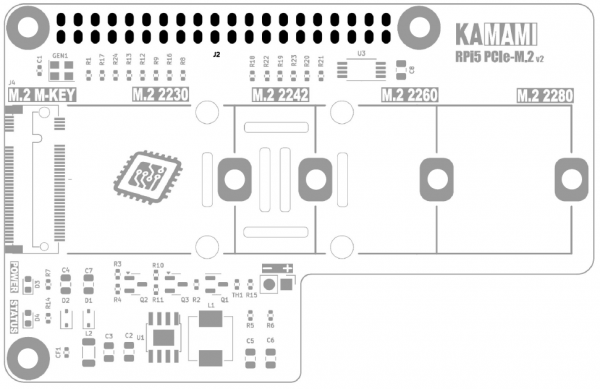
The GPIO connector (J2) on the KAmodRPi5 PCIe-M.2v2 adapter board is a female-male connector that provides all 40 GPIO lines on the RPi5 computer. This solution allows for easy connection of additional mods that extend the capabilities of the Raspberry Pi 5.
LED Indicator Lights
| LED Indicator | Description |
|---|---|
|
D3 - POWER |
|
|
D4 - STATUS |
|
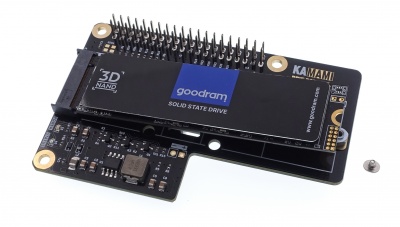
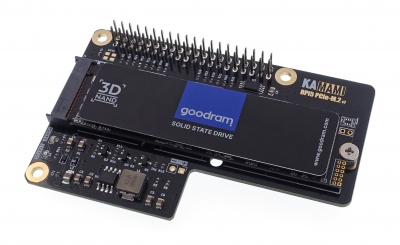
Installing the NVME M.2 drive in the KAmodRPi5 PCIe-M.2v2 adapter
| Note! Connecting and disconnecting the NVME M.2 drive should only be done when the Raspberry Pi 5 computer is turned off and disconnected from the power supply. |
First, determine the size of the drive (not the capacity) - 2230, 2242, 2260 or 2280 drives are accepted. Knowing the size of the drive, install the male-female screw securing the M.2 drive in the hole corresponding to the given drive size and screw in the screw from the bottom. Now you can insert the NVME M.2 drive into the J4 (M.2 M-KEY) connector, so that the end of the drive protrudes slightly from the board. Then, gently press the disk onto the mounting screw and secure it with a nut from above.
 |
 |
Mounting the KAmodRPi5 PCIe-M.2v2 adapter on the Raspberry Pi 5 board
First, connect the FFC ribbon to the RPi5 PCIe connector on the bottom side of the board. To do this, insert the ribbon from the center of the board, with the contacts aligned to the board plane - i.e. the blue marker must be on the outside, as shown in the drawing in the "PCI Express connector" section. Before inserting the ribbon into the connector, gently push back the lock on the J1 connector (dark element) - by about 2 mm. After inserting the ribbon, gently push the lock so that the ribbon is locked in the connector.
Now the KAmodRPi5 PCIe-M.2v2 adapter with the ribbon cable mounted should be placed next to the Raspberry Pi 5. This makes it easy to attach the FFC ribbon cable to the PCIe connector on the Raspberry Pi 5 board. Here too, you should slide out the lock, place the ribbon cable with the contacts facing the center of the board, and slide in the lock so that the ribbon cable is locked in the connector.
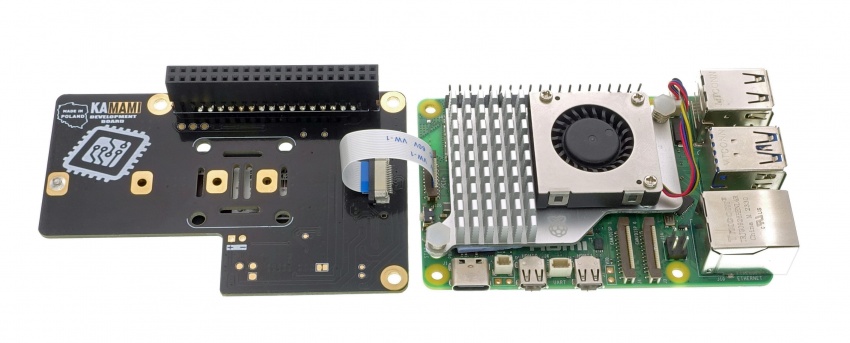
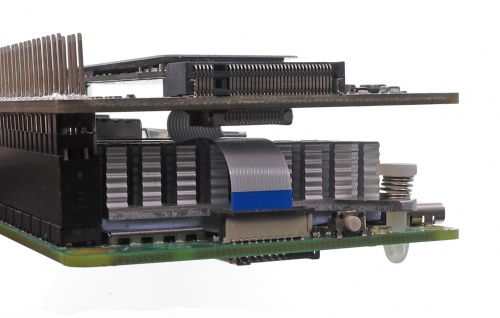
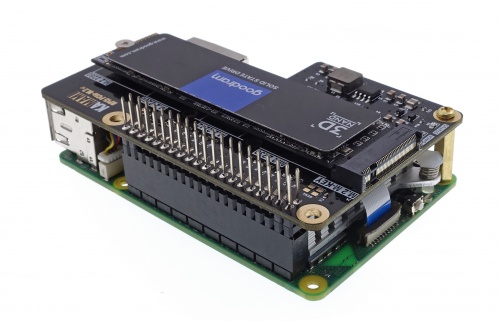
After attaching the ribbon cable, place the adapter above the Raspberry Pi 5 computer and arrange the ribbon cable so that it is between the boards (or between the adapter board and the RPi5 radiator). Finally, place the bottom side of the J2 connector on the 40-pin GPIO connector of the computer and press it down. It is also worth installing a 16 mm high sleeve at the USBC connector, which will stabilize the entire structure.
 |
 |
KAmodRPi5 PCIe-M.2v2 adapter dimensions
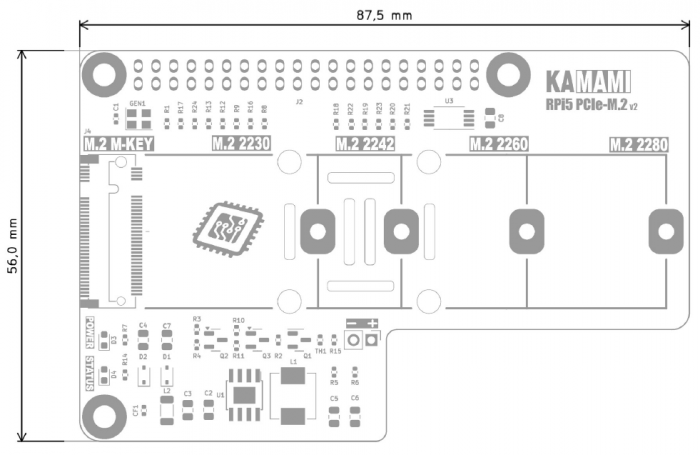
The dimensions of the board are 56x87.5 mm and match the dimensions of the Raspberry Pi 5 computer.
Booting the system from an NVME M.2 drive
Booting the Raspberry Pi 5 system from an NVME drive requires installing a system image on this drive. This can be done by having an RPi5 computer running from a microSD memory card. Follow these steps.
Operating system update
We start RPi5 with a mounted memory card containing the working Raspberry Pi 5 operating system. After the system desktop is displayed, open the console window (Terminal), e.g. using the Ctrl+Alt+T key combination and enter:
sudo apt-get update
and then:
sudo apt-get upgrade
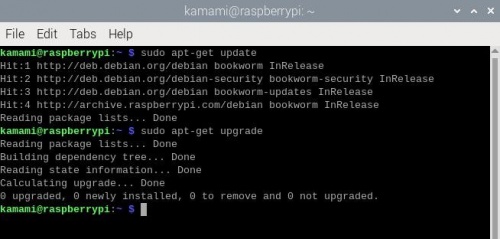
Completing all the actions may take a few minutes, depending on the number of components that need updating (the console window may display many more messages than in the example below). Confirm any questions by pressing Y (Yes).
Finally, we restart the system, e.g. by typing the command:
sudo reboot
Updating the contents of the EEPROM memory
We open the console window (Terminal), e.g. by using the key combination Ctrl+Alt+T and enter:
sudo rpi-eeprom-update -a
The console window may display more messages than in the example below if the contents require updating. Confirm any questions by pressing Y (Yes).
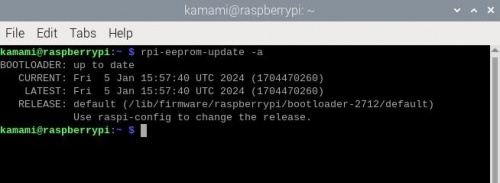
After completing the actions, it is necessary to restart the system, which we can invoke, for example, by entering the command:
sudo reboot
Installing the system on the NVME M.2 drive
With the RPi5 turned off, we mount the KAmodRPi5 PCIe-M.2v2 adapter with the NVME M.2 drive mounted. We start Raspberry Pi 5, open the console window (Terminal), e.g. using the key combination Ctrl+Alt+T and enter:
sudo rpi-imager
In the window that appears, select:
- computer model (Raspberry Pi Device): RASPBERRY PI 5,
- operating system (Operating System): RASPBERRY PI OS (64-BIT),
- disk (Storage): here we indicate the NVME M.2 disk, which was mounted in the KAmodRPi5 PCIe-M.2 adapter
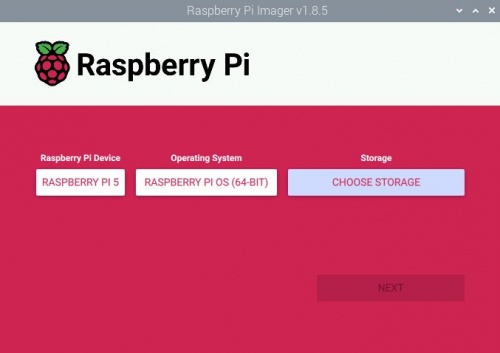
The further steps of installing the operating system image can be found in the official Raspberry Pi documentation:
https://www.raspberrypi.com/documentation/computers/getting-started.html
Finally, turn off the RPi5.
Starting the system
When we have an NVME M.2 drive with an installed operating system image, before starting the Raspberry Pi 5 computer, we remove the memory card from the dedicated slot - it will no longer be needed (the memory card can be removed/installed only when the computer is turned off and disconnected from the power supply).
The first start of the new operating system will take a little longer than the next ones, but after a while you will see the desktop of the ready-to-work Raspbian installed on the NVME M.2 drive. This is a new operating system and does not contain the changes that we made to the system on the memory card. Therefore, we need to update the operating system, as described earlier. We do not need to update the contents of the EEPROM - it did not change after changing the operating system.
Additional information
Increasing the speed of the PCIe interface
The PCIe interface of the Raspberry Pi 5 computer starts by default in gen 2 mode, which allows communication with a maximum throughput of 5 GT/s (Gigatransfers per second). There is a way to start gen 3 mode, which offers a throughput of up to 8 GT/s. To do this, modify the contents of the configuration file config.txt.
In the console, type:
sudo nano /boot/firmware/config.txt
(in earlier versions of the operating system, the file config.txt was placed directly in the /boot directory).
At the end of the file (scroll down with the arrows) add the line:
dtparam=pciex1_gen=3
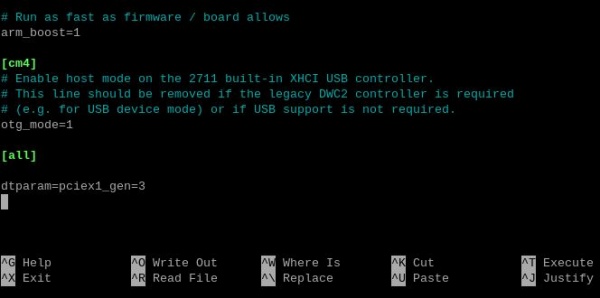
Then save the changes using the Ctrl+O keys, close the editor using the Ctrl+X keys and restart the system.
To check if the modification worked, you can analyze the system boot messages. Open the console window (Terminal), e.g. using the Ctrl+Alt+T key combination and enter:
dmesg | grep pcie
You will see content similar to the one in the screenshot below:
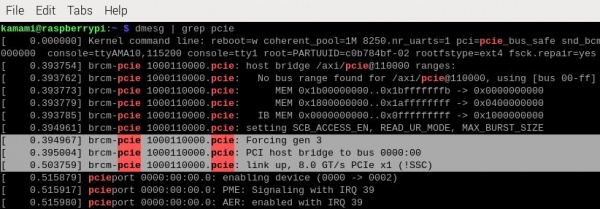
You can see the entries: "Forcing gen 3" and "Link up, 8.0 GT/s PCIe x1", which means that the modification was successful. However, it does not guarantee full system stability in all conditions.
Fan installation
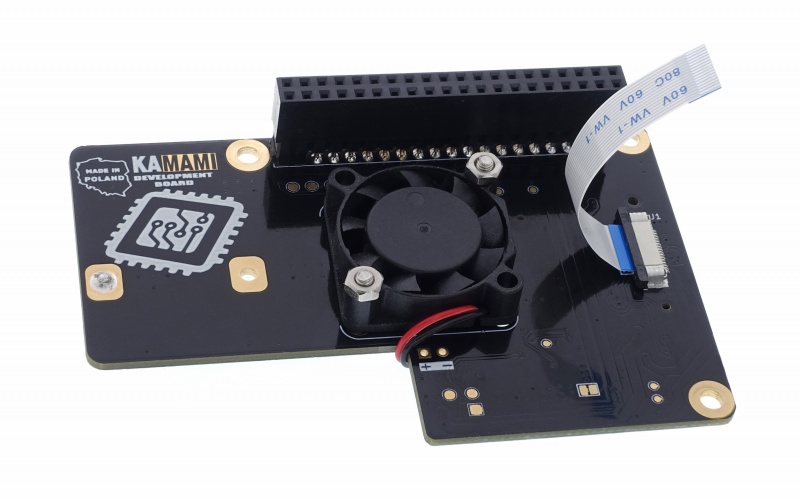
The KAmodRPi5 PCIe-M.2v2 adapter board has holes that improve air circulation cooling the Raspberry Pi 5 computer. The adapter design does not block the possibility of using a radiator with a fan dedicated to Raspberry Pi 5 - Raspberry Pi Active Cooler.
If additional cooling is not installed, it is possible to install a 25x25 mm fan on the bottom side of the adapter board. The board has holes that allow for the placement of appropriate screws, while the board has a connector that can power an additional fan. It provides voltage that is regulated by the temperature value - the higher the adapter temperature, the closer the voltage will be to 5 V. Additionally, the fan will be completely turned off after the computer is turned off (in standby mode). The maximum fan current cannot exceed 0.3 A.
NVME Drive Constant Power
The adapter supplies power to the NVME M.2 drive only when the Raspberry Pi 5 computer is running. When the Raspberry Pi 5 is turned off (in standby mode), the drive's power supply is disconnected, which reduces the power consumption of the entire set in standby mode.
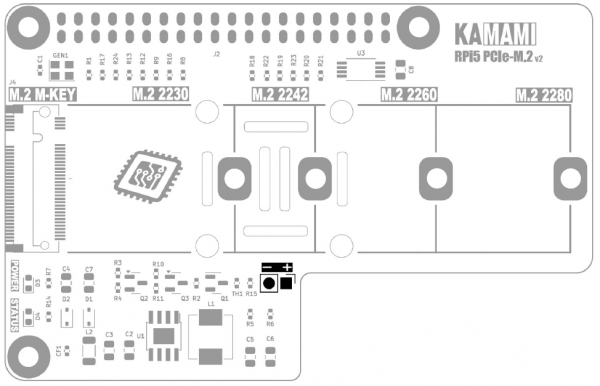
The KAmod RPi5 PCIe-M.2v2 adapter can also be configured to keep the drive's power supply constantly on. Some drives only allow the operating system to start correctly in this configuration, or then the system starts in a shorter time. To enable the drive's constant power supply mode, a jumper (0R resistor or a drop of tin) must be installed in place of the CF1 element.
